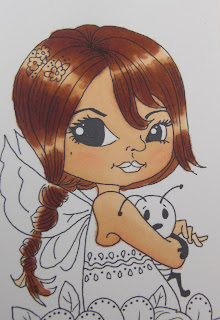
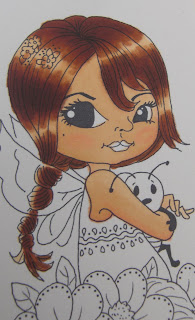
OK OK I've been harassed to do a colouring tutorial lol! There are lots and lots already available so I thought I'd do a budget one. If you've got more than a few colours you might want to read my other tutorial HERE! I've been using copics since May 09 and have the grand total of 21 (3 have run out!) so I don't use a lot of colours, I just blend. Recently I bought some promarkers as they were cheap and then I added to them however you don't actually need many at all of either brand to get started. Not everyone has a huge disposable income especially us with small kids who outgrow things every other week or maybe you're thinking of trying them but don't want to fork out on lots of colours yet but I know a lot of people want to get all the effects you get with copics and promarkers but on a budget so here's how...
This tutorial is for brown hair. There is one for blonde hair here and one for black hair here. There is also a blending tutorial here showing how much tone you can get with 2 colours.
These tutorials are designed for people who do not have a lot of pens or are thinking of trying them but if you have a good colour range check out my other tutorial HERE.
For skin and hair (dark blonde to dark) you will only need...
PROMARKERS
1. Vanilla
2. Pastel pink
3. Choose a mid brown. For the example I used terracotta as its a nice reddy brown.
OR
COPICS
1. E00 (or E51)
2. E02
3. E29 or another shade of brown
The reason for the colour choice is that they are popular shades. The vanilla and pastel pink for example were recently on special offer in a pack so I know lots of people bought them (myself included!) If you don't have these colours just use what you normally would for skin and cheeks :)
The image I'm using is called Tara by Victoria Case stamps which is available in rubber or on digi by request (Isn't she absolutely beeeeautiful!).
STEP 1
Colour in your skin colour with the Vanilla (or E00/E51) leaving a couple of areas blank as these will be lighter. Remember the more you colour over the darker it gets (to a point!)
 STEP 2
Use the pastel pink (or E02) to add some shade. Now this isn't everybody's cup of tea for adding shade but remember this tutorial is for doing it on a budget!
 STEP 3
Oh dear she looks a bit of a mess.... Patience Grasshopper :D
Pick up your vanilla again (or E00/E51) and push the pink into the flesh tone. Now some people do this in a circular motion, some zig zag or other ways whatever suits you best. Personally I'm a circular kinda girl so I colour in tight little circles over the pink whilst pushing it in. Leave bits exposed as above (part of the vanilla and part of white) whilst pushing your colour in. When its blended nicely colour right over it all including the white bits.

STEP 4
Using your pastel pink again (or E02) give her some cheeks. The skin you just coloured in will still be wet so you dont need much as it will bleed naturally into it. Go over the whole face with the Vanilla (E00/E51) again to blend the cheeks in. Don't worry about going over onto the hair when you blend as this will be covered up later ;)

STEP 5
Looking OK so far! Next we're moving onto the hair. On Tara you'll see 2 distinct "bumps" on her hair. This is normally the area the light will hit. You can add other light areas too or not its your call! So we need to go back to the Vanilla and colour in most of the hair except leave some white bands uncoloured.

STEP 6
Now to keep the hair blondish just keep building up the vanilla and add just touches of the brown. With copics you can touch the nibs together so touch the brown onto the E00 and scribble quickly onto scrap paper (to reduce the concentration of the brown on the nib) then start adding it.
OK so the rest of this tut is for brown hair as below. Pick up your brown (terracotta) and colour over the vanilla but not right to the edge, leave some vanilla and white showing.
 STEP 7
Using your vanilla again colour over your terracotta/brown (I use an up and down stroke to push the colours into each other) Push a little bit more into your white bits.

STEP 8
You'll see the terracotta/brown changing colour as the vanilla dilutes it as in the pic below. Keep pushing into the white gradually.
 STEP 9
Simples so far! Now add more terracotta leaving the white, vanilla and the blended bit so your terracotta should be a bit narrower this time. You can stroke the odd strand into the lighter bits now too.

STEP 10
Repeat this as desired for the depth of colour you want. When you're done push the vanilla right over the white. You should now be looking something like this. . .

STEP 11
Now I add smaller areas of terracotta without blending over with the vanilla and voila job done! Colour the lips in with the pastel pink and use a gel pen etc for the flowers on the hair.

This (below) is the version done with copics. As I said previously if you don't have these colours just use what you normally would for skin tone and cheeks and add a brown of your choice!
 ADDITIONAL
If after you've done the hair you've bled a bit onto the face just blend it in with the vanilla. If you have an even darker brown you can add a bit more depth by colouring over small areas of the terracotta.

The finished piece (I used rose pink for the lips and 2 blues and 2 greens for the rest) You can use other mediums to colour in the rest of the image but these 3 colours will at least get you started :)


26 comments:
Beautiful! This is awesome- thank you so much for the tutorial! :o)
BEAUTIFUL Vix!!.
Hugs
Sheila xx
Fab tutorial Vix! Lisa x
Excellent tutorial Vix. I bought some copics, tried to use them, sold them to a friend.
Maybe I should try again.
Absolutely fantastic tutorial Vix! Truly! So many people will find this sooo useful-I've picked some cool tips up:)
Fab tutorial Vix!
Great tutorial Vix you make it look oh so easy, Do some more, do so more "she cried" oooh how about doing one on black hair and one on blonde and and and clothes do some clothes, more give me more.
Hugs Marsha xx
Very interesting! Thanks for sharing, I know from experience that tuts take time! ikki
wow great tutorial! I must give this a go xx
Great tutorial Vix...
x
Vicky
WOW THANKS FOR SHOWING THIS, HAVE LEARNED A FEW GOOD TIPS, SUE XX
Thanks for that really helpful.Have you tried black hair??i tried last night but absolute disaster
debbie xxx
Fantastic tutorial. Thank you so much.
Ann xxx
This has been great for me as I have never really got the hang of mixing colours to-gether. Looking forward to your next one. Thank you. Rita xxxx
Great tut and so clear, thanks for taking the time to do this. I'll be back when you do the next one.
Jenny x
Super tutorial - thank you for taking the time and keeping it so clear. I may even manage to colour hair properly now. :)
Edna x
What a fab Tutorial - your finished image is stunning!
Ooooh.... Vix you got me interested now ... got to give it a go...
Gloria XX
Thanks for this fantastic fantastic tutorial!!!!!!
This is great. You are a natural born teacher. I think I will keep you in 'site'.
Just noticed your skin tutorial, just what I needed and thanks for all you help. Hugs Jean
Fantastic tutorial and the shine you've created on her hair is amazing! Thanks
Very very Useful!
(Lyn)
- its the first time I am using my Copic - and it went great thanks to your great tutorial. TFS.
Thanks for your fab tutorial and your finished project is gorgeous. I have promarkers and copics but have trouble with faces and hair so now I know 'how to' I will try again.
Christine xx
Thanks for tutorial. I'm new to the stamping world and loving it.
Post a Comment