Wednesday 29 September 2010

Some more from The Stampman from Create & Craft Show

Heres the rest of the creations which were for the stampmans show recently on create and craft, I didn't cringe so much this time ha ha!

This one is using the alluring ladies plate and I swirled the yinks inkpads randomly to create a background and embossed with the burgundy moonglow embossing powder over black ink.  The flower is made with a woodware multi punch with added bling.  The swirl corners are from the butterfly beauties set which I use often :D
This one is like my steasel.  To create it cut your card and panel out then place the card flat and put the panel over the front of the card and use your die cutter to cut through both layers.  This ensures a perfect line up when its constructed.  Stamp your image onto acetate and decorate with glitter and glue and attach to the back of the panel.  Fold your card over as normal when making an easel and attach panel to the fold and you'll have a see through bit like that :)
The swirls are part of the same stamp on this one which s from the artstic elements plate.


Another one from Artstic Elements and I've used the purple and gold from the starburst stains set and stamped image onto the gold and restamped onto gold mirror card, cut out the mirror and glued that on the front.
This one I used a starburst stains water technique using the same purple as above only it comes out lilac.  I've used a circle die cutter to cut out a crcle at the front, attached lace with glue dots and hung the image from a couple of hoops.
This one is using the olice green from the mardi gras set (which is yum!)  I've actually just coloured the face with a promarker blender pen!  I used one of the red embossing powders over black ink then used a blender pen which reacts with the embossing making it bleed, in this case red then swished that around to add highlights and shading (There's an article in this months craft stamper using a similar technique)
The ivy leaves are real and have been embossed with different colours of the moonglow EP's.  Cant take credit for that idea as I saw it HERE on Gingersnap by Laura Liddell.
This was a real quickie before I made my mad dash to the post office!  I'm quite rubbish at triple embossing so decided to stamp the image first and capture it!  Its stamped onto mountboard then I've added the Yinks randomly then various moonglow EPs from the daybreak set. 
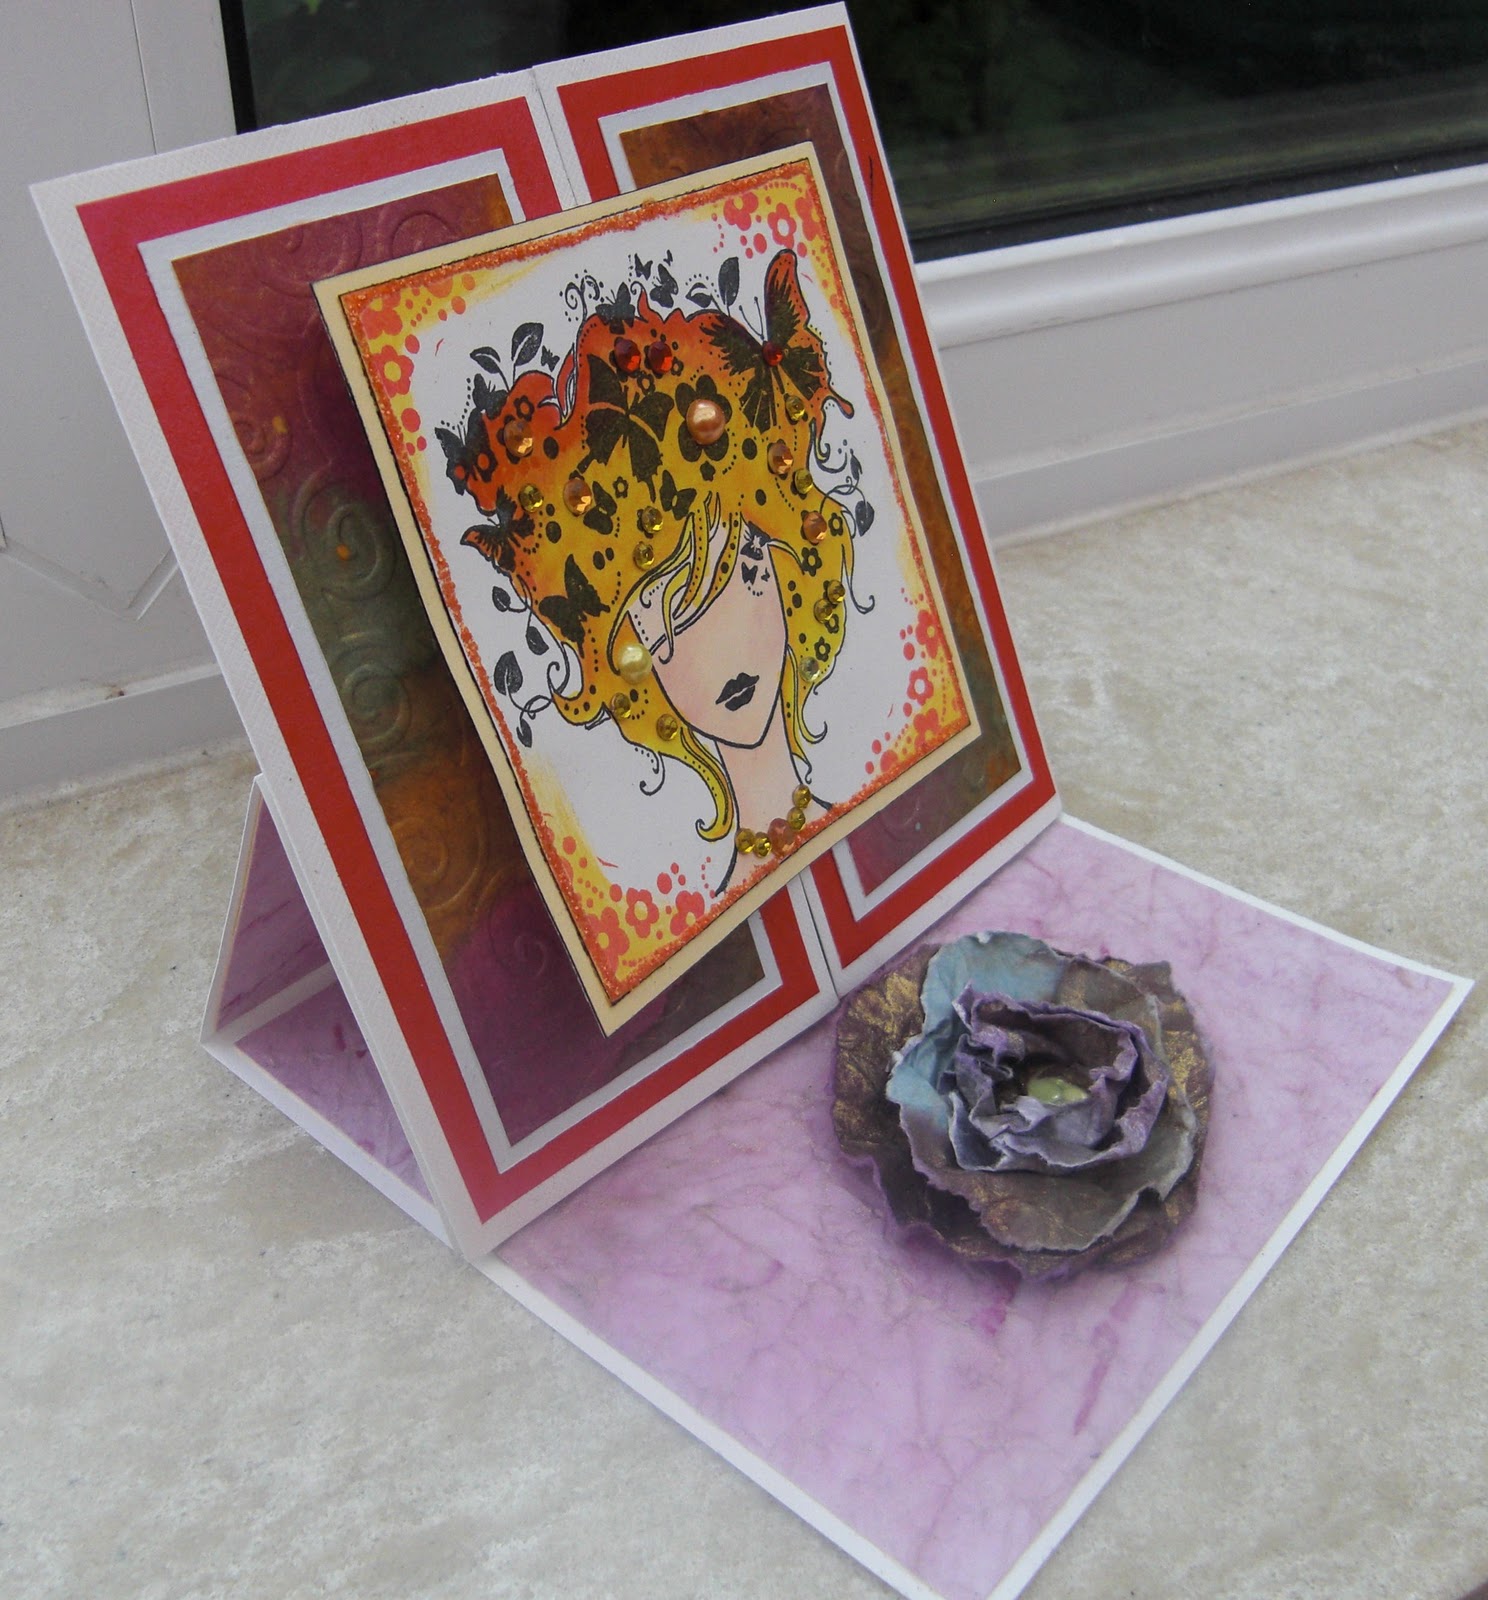
This is my summer/winter easel gatefold!  It feels a bit of an unfinished symphony but you are restricted what you can and can't use to some degree and I'd already put 3 and half hours into this one lol!  The front is soooo heavy I had to reinforce the base!  I've used starburst stains from the mardi gras set and promarkers to colour the bling maiden from the butterfly beauties set, flower stopper is made from starburst stains.


Inside is the winter version covered with snowflakes.  Jill's chuckling as she knows where this came from mwhaha!


And finally my ickle domino book!  I've inked up the stamp and placed 2 doms side by side on it to get half a face on each then after a blast with the heat gun I've inked them up with versamark and carefully added pink moonglow embossing powder to the face area and red to the hair, repeated a couple of times.  I've used the heat gun to push the colours into the right places then edged with a gold acryllic paint. 


Hope you can get some ideas how to use the stamps I've featured, you can find them all on The Stampman HERE

Sunday 19 September 2010

Keyring from The Stampman on Create & Craft 15th sept (part 1)

I'm going to start showing my creations from The Stampmans show on create and craft which was on wednesday.  Jill did a fab show as always packed full of techniques and well worth watching.  For heads up on future appearances by Jill follow The Stampman blog which is always packed with tips too!

Okies first up my domino keyring.  This is quite an easy technique to do using starburst stains.  Ink up your stamp with a pigment/embossable ink and place it face up on the table.  Sand down a domino to remove the very shiny surface and wipe clean.  Place the domino down onto the stamp.  Now then if you fluff this you simply wipe clean and try again, doms are quite slippy so it may take a couple of goes if you're new to it.

OK now your image is there emboss it.  Once cool enough to touch take a paintbrush and use some starburst stains (make sure you shake before use to get the mica powder mixed)  Place drops of the stains on the domino until it puddles on the surface then using your heat gun at a distance gently dry it.  If you get too close and the stains wll blow off the sides so just add more if it does and move the heat gun further away.  I repeated 3 times to get a real depth of colour.  I coloured the heart with a touch of alcohol inks and when completely cool wipe gently over the embossing to remove the mica powder (or leave it on if you like the effect!)

Domino was finished off with gold stardust beads, black swarovski and red glass hearts with antique gold filagree leaves.  Used Aspects of Design 62 - Artistic Elements

Saturday 18 September 2010

Cameron's Challenge at OSAAT


One stitch at a time and I did it creations have held a rainbow challenge in aid of Cameron who is autistic, you can read his fundraising blog above.  I did pwomise Stitchy I would take part as I'm on the spectrum myself and I've been mega busy this past 2 weeks but I couldn't let her down so managed to finish this one off today using an image I've coloured and saved for a rainy day by Ching Chou Kuik called Seeing Through.  The background at the top is hand painted using posh impressions inks with some rainbow DP at the bottom and all the gems added individually, they are AB coated so are also rainbow coloured :)

Entering into..

OSAAT - Camerons Challenge
I did it creations - Autism Awareness

Wednesday 15 September 2010

Crafts & Me #13 - Easels

Challenge time again at Crafts & Me and this fortnight its my turn to host and I've chosen the ever popular theme of EASELS. 

The weather has turned decidedly autumnal the past couple of days, I'm freeeeezing!  With that in mind I picked up the ching chou kuik stamp 'Autumn Harvest' which I got from Crafts and Me here and set to work!  I notced the little grapes in the corner and I've been waiting for a chance to use the scrummy papers by Bo Bunny I bought a while ago and put away to stroke sometimes but no I must be brave and USE them ha!  One of the set is printed with grapes so was perfect for this image.

I've coloured with promarkers and added glamour dust detail to the hem line and wings.  Now to give Sarah a giggle yes I coloured each individual grape in 2 colours, added a dot of white souffle pen AND glazed them :P  The pumpkins are also glazed.  As the original painting has flowers in the background but the stamp does not  thought I'd drag out my tapestry stamps and added some flubbers in the background by masking off the image then finally added wild honey distress ink (yum yum yummy colour!)  The big purple flowers were white (I bought a bulk load from wild orchid in white) and I dyed them with adrondack color wash (wild plum and a touch of aubergine)  Swirl came with the Bo Bunny set.

Phew right, I'd also like to enter into...

Creative Card Crew - Autumn
Pollycraft - Autumn
Totally Gorjuss - Flowers
Marks Finest Papers - Fall
Paperplay - Autumn
Daring Cardmakers - Masks
Allsorts - Autumn


Alcohol Inks at Crafty Cardmakers

We've dusted down our alcohol inks over at Crafty Cardmakers and are using them for our "Spotlight challenge"  The spotlight challenge is all about using techniques, styles or products to show different ways of using them so if you're one of the people who avidly bought said alcohol inks at a show, splodged them around a bit and consigned them to the cupboard then now's your chance to master them!  The team have come up with some beautiful samples to inspire!

Here's mine :)
The background I made with Claudine Hellmuth sticky back canvas and I sprayed blending solution on before dropping blotches of cool peri ink which spread and turned shades of pink and purple.  I've smudged on some gold reinker for some bling.  The other background is pink and purple alcohol inks on glossy card and I've used a cuttlebug folder.
Image is Melinda Christmas Angel I got at Crafts & Me here coloured with promarkers, sakura stardust pens and quickie glue pen with glamour dust.

Thanks for looking :)


Monday 6 September 2010

Lilac Tilda (Finally!)

You won't believe how many attempts I had at a lilac Tilda haha! Made the mistake of making the card, adding the image to colour whilst its stuck on *but* I was using a tilda I got in a swap and the paper quality was really really poor and the poor love bled profusely. Then I tried again and looked at a couple of sketches but my head wouldnt work right so I ended up taking a deep breath and stepping back and just going at it freestyle with a tilda I know is on whisper white! Oh then I did the cuttlebug technique and fluffed that as well so that took a couple of goes so finally I managed it lol!

Tilda coloured with promarkers, I've scribbled a sakura clear pen on the circle background then quickly rubbed in with my finger, this gets rid of the pen lines leaving just the glitter. I've edged with a versa magic inkpad and stickles round the edge plus a sprinkle of glamour dust just to make sure it was sparkly enough! The very sparkly background is this fab sticky stuff I picked up at The Stampman which is like sticky back plastic but glittery so you can stick things on it without them falling off as they tend to do on glitter card. Added tons of pearls which come on a line so you just snip off how many you want (also from The Stampman) and various flubbers from stash :)

There ya go Corry I DID IT mwhahaha!

Totally Tilda - Lilac & Lace
Crafty Emma's - Floral Frenzy
Magical Mondays - Lace (Not sure if this Tilda is magical but I've entered as its from the fairytales range and she's blowing fairy dust, let me know girls!)
Craft your days away - Girly & Glitter
Cute Card Thursday - Material girl (Lace)
Fairy Fun Fridays - Pearls & Lace
Fab N Funky - Living in a material world (Lace)
Simon Says Stamp - Pearls & Lace
Paper Sundaes - Mixed Media
Pocket Full of Posies - Floral Fantasies


Clean & Simples at Crafty Cardmakers

Its a Clean & Simples theme over at Crafty Cardmakers this fortnight and the team have made some absolutely beautiful samples! I must say as much as love my papers and embellishments sometimes its just nice to do something straightforward and let the image do all the work :)
Its not actually my turn to play this week but I couldn't resist once my new Lili of the Valley stamps arrived and I saw that Secret Crafter, Sparkle Creations and Paper Players had the same theme so I'm playing too! This is my first one of the year too :)

Image is by Lili of the Valley and is coloured with promarkers, Ive used 2 shades of blue around the edge then the blender pen to merge them. Kept very simples with this one and added sakura stardust clear pen on the tinsel to make it sparkly, glaze pen on the baubles and stickles glue around the edge of the card. Mounted on gold and white cardstock with a couple of iridescent sticky gems :)

Would like to also enter into...

Secret Crafter - Clean & Simple
Sparkle Creations Christmas Card Challenges - Clean & Simple
Paper Players - Clean & Simple
Stamp, Scrap & Doodle - Christmas
Cowgirls Sunday - Anything goes


Saturday 4 September 2010

Some news and a really tough card!


First up my really good news is that I am honoured and delighted to be featured in Craft Stamper magazine this month with an easel clock card and even better I was one of the editors picks, fankoo Katy! Hope you like the feature. Here's a little sneak peak of the project whch you'll find on page 38 of the October 2010 issue :)


Next up a *really* I mean *REALLY* hard card for me coz its PINK! Yes yes I know I do pnk sometimes but it still ends up dark so I really wanted to challenge myself to keep it candy pink. I *nearly* did it although I went for a more coral look on Tilda but kept the papers fairly light which believe me was sooooooooo hard!

Tilda is coloured with promarkers, the background I did with green and blue aqua markers (only two I own lol!) Details I've added are glamour dust on the wings and flower soft on the headband and flowers. The matting I made with a coral promarker and a white souffle pen and I've used ickle mirror mosaics. Flowers have diamond stickles on and card has had a squirt and then some of pearl glimmer mist.

Would like to enter into the following...

Stamp Something - Something cute

OSAAT - Girly

Oh Alice - Sparkle

Pocket Full of Posies - Winged things (entry 2)

Just Magnolia - Anything goes

Penny's - Birthdays

A Crafty Little PLace - Anything goes


Alter Ego

I've been admiring these digis from Kenny K for a while and finally succumbed last week. I thought these two went well together like a night and day version or alter ego. At the front the all american sweetheart with what she really wishes to be behind her (thats my interpretaton anyhow lol!)

They are Vikki Lee Vicious and Rock Chick by Kenny K which I've used paint shop pro to merge (I've wrote a tutorial here how to do it n PSP) Images are coloured with promarkers and details have been added with my trusty quickie glue pen - silver foil on the buckles, earrings, guitar and I've used a clear sakura stardust pen on the rock chick only to gve her some sparkle which you can see clearer in the bottom two pics. Wording is a dymo and pink paper is from DCWV rockstar stack.
When was colouring this I constantly had a song I dont actually know in my head but it goes "She was an american girl" and its the bit in silence of the lambs which the senators daughter is singing in her car. (Google tells me its American Girl by Tom Petty!)

Entering into...

Kenny K - Music

Charisma - Inspired by a song (American Girl - Tom Petty)


Wednesday 1 September 2010

The Stampman ATC swap - The Look

Are you ready for another round of ATC swaps with The Stampman? This month the theme is "The Look" so if you got your Craft Stamper magazine last month you could use the free cover stamp designed by Tracey Coates! If you dont have it you can interpret the challenge as you wish :)

I have the full size version of the stamp and its a favourite (no really!! hehe!) I've made a set of 3 for this one to join in the swap and will be posting off to The Stampman HQ soon.

Jill got a little glimpse into my train of thought on this one :) I'd been watching cbeebies (as you do!) and saw a kid with their face painted as a butterfly and I thought that would go nice with this stamp.

Hope you can come over and join us and swap some fab ATCs in the bargain!


I used The Look stamp from Aspects of Design 63 - Alluring Ladies. Coloured with promarkers and glitter added with a quickie glue pen and some glamour dust :) Butterflies were hand drawn with a letraset pen.