Thursday 29 April 2010

I love sweet pea stamps but...

A phrase I see often around blogger is "I love sweet pea stamps but..." and its usually about the colouring, I see some people terrified of them! Personally I find them less fiddly and faffy than some other designs as there is generally a large skin area, long flowing hair, tails or wings so not as fiddly or scary as you think. They also have excellent lines such as on the hair making it easy to identify highlight points. Some other designs have solid hair with just the outline, I actually find them much harder to do than sweet peas.

I usually make a wednesday/thursday post for Crafts & Me showing a sweet pea design so what I'll do for a couple of weeks is show you different ways of adding colour using different mediums. Not everyone has promarkers/copics or wants them so I'll cover some other colouring mediums and easy tricks.

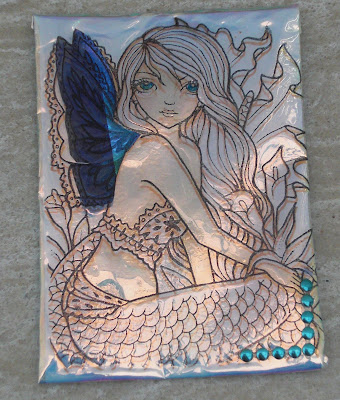
This week is a very simple technique using Fantasy Film. Unfortunately its not the easiest thing to photograph but its highly iridescent and shiny, changes colour in the light and looks spectacular under halogen lights. It also gives a kind of 3d effect when you move it due to the small gap you get between the stamped image and the film.

For this one I have used September Rhythm and mother of pearl fantasy film.

Firstly colour just the skin tones on the stamped image and cut it down to ATC size. Ink up the stamp again using a permanent inkpad such as stazon or brilliance and place one or two pieces of fantasy film over the stamp. Next place a piece of greaseproof paper over the film and using a dry iron such as an encaustic one iron on top of the greaseproof paper until you see the image shwoing through, 20 seconds is about right. If you've never used fantasy film before I have a couple of video tutorials here you might want to check out before starting!

Your image will be on the film now like below.

Next line your film up over your stamped image and secure it at the back. It ight be a tiny bit loose but dont worry it adds to the effect :)

Add some bling and you have an ATC or card topper which is full of gleaming colour!
As there may be a tiny bit of a gap between the film and card it actually gives a 3d effect when you turn it and looks fab!


This one I used Dark Royalty and made the 3d wings using cosmic shimmer film in a contrasting colour. I coloured just the eyes with a promarker.
And finally this one is Dance of the Butterfly and I've coloured more on the film with promarkers. They do spread out rapidly so just a very gentle touch. As I used stazon ink (which reacts with promarkers) you couldnt blend colours like you do with card and paper so just choose areas to touch up with a solid colour.
You can also see the skin tones underneath on the card showing through quite well on this pic.

All of them have a pinky/blue/ pearl colour with the skin tones showing through below. Try different colours of fantasy film for different effects. Hope this has been of some use to you and I'll be back covering some different mediums soon.
All the stamps and fantasy film are available at Crafts and Me in the UK.

Wednesday 28 April 2010

Crafts and Me challenge #3 - Sparkle

Crafts and Me challenges want to see SPARKLE for this challenge oooh I can hear you shouting YAY from here!


For this challenge I have used a sweet pea stamp - Rising Flame which you can find at Crafts and Me here. I have coloured her in promarkers using yellows, oranges and reds and blending together and added lots of shimmer with orange, red and yellow sakura stardust pens then finally the clear sakura stardust which I rubbed in with my finger to blend any obvious lines. The beads on her are fired brick distress stickles and the added sparkle to the paper roses are stardust stickles. The sky background is distress inks in spun sugar, mustard seed and spiced marmalade.

For the background I have used starburst stains in autumn maple leaf and california poppy gold and the leaves are punched from starburst stains in lucky shamrock green. I also used DCWV pocket full of posies paper and stampin up (one of the pastels) which I cuttlebugged using divine swirls folder to look like waves.

Have to confess to a bit of an accident with this one! Having spent 2 hours colouring her as I wanted a real depth of colour so I do a bit, leave it and come back then do a bit more I then put in the distress ink sky and my last bit was to add the spiced marmalade around the edge of the sun - then I dropped the inkpad across the image aaaargh! Very quickly wiped off but I left a line across the left eye. Not to be deterred I thought what I could do to cover it a bit so decided on my new toy I got at the weekend stampman workshop - a bottle of mica magic reinker which I've mixed with water to make a gorgeous spray. I kinda sprayed this into the air and wafted the image through the mist so its got a sparkly gold shimmer over it.

Hope you can join us at Crafts and Me challenge - sparkle!

Also entering into...

Sweet Pea Stampers - Under the Sea

My Time to Craft - Ruby ruby ruby ruby (that was No1 when my son was born lol!)


Tuesday 27 April 2010

Katys Corner group Art Deco pages

Not shown these before but they are my very first art deco pages having taken the plunge in Katys Corner group. These pages were for Alison - Cockney Blonde who's theme was Imaginary Friend, your childhood, who you aspired to be etc. Having spoke to her to clarify a bit more I decided to do one page as a representation of childhood and one page as representative of now.

First one I used a Mo Manning image - end of summer coloured with promarkers. I kept it very very basic to represent the carefreeness of childhood, when life was simples. I cant remember the makers of the text stamp but they have lots of phrase stamps and grumpy ladies!

The 2nd page is representative of life now showing the stresses of life. The image is Fire Dreams by stamp oasis and is available at The Stampman (though you may need to ask as its on the shelf) I have several of this range of stamp (triangle portrait, starry eyed, moon child, dryad & celestrial dreams prob more coz they're niiiiiiiiice!)

I've coloured this with promarkers although its not showing too well then I've used UTEE on the face and cracked it (to represent me cracking up ha!) The background is distress ink swiped outwards and I've put blotches of gold acrylic on and over stamped.

The stars below her face are coloured in chakra colours (red, orange, yellow, green, blue, indigo, violet) as are the beads on her head starting with the large red star and working up.


This is a keyring I made ages ago with that stamp which was stamped on a domino stampbord coloured with alcohol inks.


Just thought I'd show some stuff coz I been away a few days! Actually I've been a busy busy bee and made 33 ATCs last night although they're all kinda 3/4 done and just need bits and bobs on them but I had fun!

Just also to let you know I decided to step down from the I ♥ Promarkers team as I'd taken on a bit too much to be able to give the commitment they need. I'll happily carry on playing in the challenges as time allows but it wasn't for me so good luck girls!

Saturday 24 April 2010

At a loose end this weekend and near the North West?

The Stampman are having a demo weekend with lots of lots of reduced stock items and lots of demos each day. They are open 10-5 both days and here's the rundown!

Saturday 24th

Demonstrators are Jill Tuck (Mrs Stampman)
Tracey Coates (The exceptionally talented artist for the stampman who draws nice things for us to play with!)

Also attending are Debbie Dolphin - Queen of easels who has recently been featured in Craft Stamper magazine, Michelle Midnight Crafter our newest DT member and I'm on day release so might get my hands mucky and show some starburst stains!


On Sunday 25th the demonstrators are

Leonie Pujol - Create & Craft TV presenter
Jill Boulton - Workshop Tutor


Address is

The Stampman
10 Craven Nursery Park
Snaygill Industrial Estate
Keighley Road
Skipton
North Yorkshire
BD23 2QR

And you can also get a brew there too! Hope you can make it as it will be a lot of fun and you might even catch a glimpse of Mr Stampman himself.

Ohhhh I'm going to be in heaven being surrounded all day by starburst stains :D:D:D

Friday 23 April 2010

Exotic Halloween

Hellooooo! I'm running a tad late this week but am managing to catch up at last! Today I want to show you Ching-Chou's design "Exotic Halloween" which is from plate 11 available in the UK via CRAFTS & ME. I actually think this one has an ever so pretty face and really won't be limited to using in October.
I've coloured her with Promarkers, a little tip I picked up from from Randi in colouring in the candle is to continue colouring your image behind is as normal but with a lighter hand then go over the candle area several times with the colourless blender. I've also then added sakura stardust in clear all around the candle and the inside I went over with a copic spica clear pen. I've also added sakura stardust highlights in clear and orange and also the sakura glaze pen over the eyes and lips.

The background I've coloured with promarkers adding lots of the blender then colour then running it in with my finger for a nice subtle blend.

I've made a gatefold ATC and the panels are made with starburst stains which I've run through the cuttlebug using the divine swirls embossing folder. The door handles were large white sticky pearls i've coloured with black diamond stickles.

I make lots of ATC's this time of year as I go to the Port Sunlight stamp show which is on May 8th so if you're outside about 1pm I'll have several sweet pea ones available to trade :) Can't miss me, black hair with plum streaks, black boots with bright pink laces :D


Wednesday 21 April 2010

I ♥ Promarkers #11 Black, White + 1 other

Its time again for another challenge at I ♥ Promarkers, this week it is Black, White & one other.
I have gone for pink as my one other on this and decided to have a go at colouring Daisy by Sugar Nellie in greyscale. I saw it done a while ago and thought she looked lovely so thought I'd give her a whirl!

Image is of course coloured with promarkers in Ice greys with rose and antique pinks. Ive used distress stickles in worn lipstick around the edge.
Hope you come and join us and pop over to see the other DT's creations!


Tuesday 20 April 2010

Enchanted Tag

Over on facebook we have a little mixed media group going to swap tags of a given theme and our 2nd swap is "Enchanted"

For this I've made my tag using a fairy silhouette stamp by Inkadinkadoo which I just totally fell in luuurve with ages ago but never got round to using her! I've made the background with encaustic wax then used my stylus to create a moon. The fairy wings and butterfly are both fantasy film and I've added broken china distress stickles here and there :)
The background card I made by spraying radiant rain solar gold and Moonglow glitz spritz in desert moon endless sky.

If you're interested in swapping tags with some very talented ladies over there pop into the group which you'll find here. There's just enough time to sign up for the next swap which is "Memories"

I'm entering this into

Sir Stampalot - Fantasy (3rd entry, all different type)

This challenge has a CRICUT and CART as its prize and such a fabulous theme so get entering quick quick!!

Tag It On - Under the Moon's shadow
Frankie's baaaaaaack! Welcome back to blogger hunny!


Monday 19 April 2010

Crafty Cardmakers #19 - Desert Island

Oooh another toughie from me at Crafty Cardmakers hee hee! Imagine if you were to be stranded on a desert island for at least 6 months. What items would you absolutely *need* to take with you, what wouldn't you grow bored of? The thought behind it is to help newer crafters make some choices on whats REALLY useful and a sure fire winner for their hard earned pennies. We're faced with so many choices but where would a newer cardmaker start given the huge array of products? If you wanted to start cardmaking what are essentials?
I will be compiling a hot list at the end of it based on entries so if you're more experienced please do come and play as your input is very valuable!


So what would I take?

I think for me it absolutely has to be starburst stains. I love the shimmer and the way they all come out unique when making backgrounds. I don't feel a desperate need for printed patterned papers, they're nice but I do prefer my own.


I would also need flowers, I love prima flowers and paper roses.

Also ribbon especially white satin as I can colour it with my promarkers which are an absolute must for me to take and I just love sticky gems and pearls, so much easier nowadays instead of fiddling with glue with the non sticky ones.

Stamp wise most definately the butterfly beauties stamp plate with The Bling Maiden as there are so many possibilities I'd never get bored. Also embossing powder, I love moonglow midnight embossing powders which are black but change colour (I've used midnight teal here) I've also used a woodware leaf punch which is a firm favourite and cuts card easily.


Brilliance ink is another must for me, it can be embossed, dries on most surfaces and has a lovely shimmer and finally stickles glitter glue as its high quality and dries 3d instead of the glue seeping into the paper and most of the sparkle disappearing.

I've made this card using starburst stains in bachelor buttons blue and french lilac violet and swiped across the blue with black brilliance ink. Image is stamped and embossed with moonglow midnight teal and I've coloured the face with promarkers and watercoloured the hair with starburst stains in frosted forget me nots, baby blue eyes and tibetian poppy teal. I've added lots of sticky pearls and iridescent gems and some white paper roses swiped with brilliance sky blue and added stardust stickles glue for sparkle. The leaves I've made by swiping the brilliance blue onto card and punching with a woodware punch (1.5" grass)

I do hope you'll come and join us at Crafty Cardmakers and show us your absolute favourite must haves!

Also entering for...

ABC Challenges - Sparkle
Penny's - Anything goes
My Time to Craft - Pearls (2nd entry)
Cute Card Thursday - Touchy Feely
Flutterby Wednesday - 2nd Entry


Sunday 18 April 2010

VIDEO TUTORIAL - HOW TO USE FANTASY FILM

Now this is new territory for me, a VIDEO tutorial so be gentle (and honest!) with me lol!
Having recently got some fantasy film I realised that I actually had this stuff a long time ago but didn't know what it was for or how to use it as it didn't come with instructions back then so if you have some and aree a bit unsure as to how to use it then here's a couple of quick video tutorials on making fairy wings and making 3d butterflies.


MAKING FAIRY WINGS WITH FANTASY FILM


MAKING 3D BUTTERFLIES WITH FANTASY FILM


Just a couple of further notes, if you use a domestic iron set the heat on low and work your way up. I set my encaustic iron to between the low and high settings and this works fine but a domestic iron will probably be hotter so experiment and start low.
Use ink that will dry on non porous surfaces such as stazon, I've used brilliance as I couldnt find my stazon (now found!)
You can use several strips of fantasy film, I do 2 strips as I like things delicate but you can make some fab embellishments using 4 or more sheets.
You can colour fantasy film with copics and promarkers, particularly if you have an airbrush system. You can also add stickles, bling almost anything :)

Friday 16 April 2010

Elaine Cox ATC

I thought I'd have a change of scenery and go for something a *bit* cute and have made a little ATC out of this Elaine Cox image - Celestial Garden Fairy which is available via Crafts and Me or as part of a 4 image sheet with 3 other delightful images here.

Its the big eyes I like with these stamps, I love colouring in eyes, I think its the novelty factor as an awful lot of stamps dont have eyes you can colour so the bigger the better for me :D

Image is coloured with Promarkers and I've added a clear glaze with glamour dust over the moon and stars. The wings I've made with fantasy film, I made a couple of layers so that they flap :)

Don't forget the new challenge is up over on Crafts and Me's challenge blog so come join in the fun! The theme is pink, brown and yellow :)

Wednesday 14 April 2010

Time for another challenge

Its time for the 2nd challenge over at Crafts and Me! There was a great response to the first challenge and I hope you pop back and check out the new challenge set by Trish which is a colour combo of Brown, Pink and Yellow! They work wonderfully well together :)

Seeing as I'm in a challenging myself mode lately I decided I wanted to make something different so after making one box out of several pieces of chipboard I looked at it and drew one out I could make with a piece of 12x12 card with just a join at the front. This is 4" high by 3" wide and deep and I'm using mine to hold my ATC blanks and bits and pieces that I'm making for the Port Sunny show. I will post destructions separately in another post later on in the week.

I've decorated my box using Stampin' Up tea and crumpets papers and flowers are from stash. The image is Moonlight Whispering by Sweet Pea which you can buy in the UK via Crafts & Me. I've cut the cat out again (sorry cat!) as I wanted her perched on the top of the box. To do this I've left a 1" piece of card below the image which I glued onto the back of the box then covered with the DP's.

I know she's not a fairy but I thought she looked a bit sad that she couldnt fly so I gave her some wings nicked from Dark Royalty :D
To give her wings I've used fantasy film in Dandelion. Think gold with a rainbow sheen. I'll also show you with the box how to use fantasy film, its really easy pwomise :D


I made two sets of wings so they're 3d, they also make rather pretty butterflies if you draw the body bit with perfect pearls, 3d crystal lacquer or similar or perhaps a line of sticky gems :)

Also entering this into...


Sir Stampalot - Fantasy (2nd Entry)

The Crazy Challenge - Don't call me flat
Pollycraft - Pink & Brown plus Yellow (or green)
Flutterby Wednesday - Open week (BTW they have an open DT call if anyone's interested)
Incy Wincy Designs - Something Magical (Also have an open DT call)


3d wings

I ♥ Promarkers #10 A Sketch

Gosh where did the week go! Its really flown by and time for another I ♥ Promarkers Challenge! Pop over to see if you're a winner last week. This week we have a sketch for you and we're sponsored by Whimsey Stamps who gave the DT some of their new images to play with that have been released this week. They are all superb, the cat made me laugh as I think we all know a cat just like that and I opted for the new turtle so thank you Whimsey for your sponsorship :)


Image is coloured with promarkers using lime greens for the light bits with the grey green as a shadow and leaf/grass/emerald for the darker greens. I've coloured the pearls in with emerald and outlined the image with cool aqua. The 2 little papers flowers are coloured in with rose pink to match the centres of the blossoms. Its a nice easy sketch this week so hope you join in!

Am also entering this into...

Stampin' for the weekend - Ribbons & Bows

My Time to Craft - Pretty Pearls (They've been coloured green)

Papertake - Cutie Pie

Creative Card Crew - Happy Birthday

Sunday 11 April 2010

The Ugly Sister

Isn't she just the most amazing ugly sister hee hee! My friend Teresa over at Trees aWard is an artist for Squigglefly and put this lady on her blog a few weeks ago as a freebie and I had to have a go with her.

I've coloured with promarkers using what I call cinderella colours (Blue, white and light pink) The ribbon bows are coloured with light and mid blues in promarkers to match. I also have these fabulous feather thingies which have gems in the centre and she just had to have one with her as she's fabulous dahhhling!

She needed a phrase and the expression on her face gave me the ooh I say!
Pop over to Teresa's Blog as she has a lot of useful info on there and is just a fab person and you can pick up the ugly sister for free :D

Entering this into...

Dare U Digi Stamp - Metal (The thingies with gems are in centre of flowers are metal)
Allsorts - Petals & Pearls
Digital Tuesday - Blue, White + 1 (Blue, white & Pink)


Thursday 8 April 2010

My Arty Journal Page

I've been pondering over this art journal page for a couple of weeks now and originally I tried doing it in acrylics as that seems the done thing and I struggled. I realised what was bothering me was the materials, they weren't ME. I couldn't express something as personal as an art journal page using things that were impersonal to me so I ditched it and went with what I know and what works for me whether thats conventional or not because I'm not the most conventional of folk.

In this case I went with distress inks, a splash of moonshadow, a misting of radiant rain, a splodge or two of gesso and good old ink.

What did I want to write about is my next challenge and following the thought of changing materials as they were more me I went with how others may view me and how I view myself so I've stamped the eyes from Tracey Coates' Alluring ladies sheet which is of course from The Stampman. I use this as a blog header as its distinctive and it took me an hour to colour and I'm very pleased with the result :)

I've used distress inks and moonshadow ink to colour the page and swiped some gesso here and there and added a band of an old book gessoed and distressed across the centre. After I stamped and embossed the eyes I left it for a bit of pondering and the words from the same stamp sheet were jumping out at me and I thought well I don't have ANY of them! Anyone who actually knows me personally (and only the very brave few stick me out!) will agree I'm not in the slightest bit elegant, graceful, glamourous, don't have flair and most certainly don't have any sense of style.
My favourite shoes are black CAT boots which are a bit like steel toe caps without the steel. OK I've added bright pink laces to mine.
I've reflected this by using Helitrope purple plum starburst stains (From the Japanese gardens set) which is like a hot pink with a purply tint. The embossing is midnight teal, another firm favourite. I've also added the flying heart from the Artistic Elements sheet because I think its just fabulous and reflects my love of art & craft and the sentiment is also from there.
So here's a little page about me and my unconventional self complete with sparkly bits :)


Wednesday 7 April 2010

Dark Sirene


I was definately in a blue mood today, must be because the sun was out and you could actually see a clear blue sky!
I usually approach a design by rummaging through my papers and seeing what catches my eye and today it was a blue background. Now next decision was which gorgeous sweet pea do I fancy colouring today, I opted for the Dark Sirene which I bought a couple of weeks ago and haven't got round to playing with yet. She's available from Crafts and Me in the UK.
I stayed with a blue and black theme to tie in with the paper and made the centre band by placing a piece of sequin waste over some white card and dabbing a blue brilliance ink over it.
I've added sparkle on the hair using a sakura clear pen and also used the black glaze pen to add more interest. The smaller flowers all have an iridescent gem in the centre with more gems and pearls on the design.
Image is coloured with promarkers. To do a darker skin tone than your norm just change your regular colours but *think* they are. For example I usually use Ivory, Blush then vanilla for the shadow so in this case I "pretended" that Vanilla was Ivory, Sandstone was blush and Tan was vanilla if that makes sense lol!
Thanks for looking :)
Entering into....
Daring Cardmakers - Diamonds (There's tons of them!)
The Pink Elephant - Nature (Dark Sirene is entwined with nature)
My Time to Craft - On the Spot
Also a reminder that Crafts & Me's 1st challenge is underway and you still have another week to enter. The theme is faeries or wings which you'll find here


Tuesday 6 April 2010

I ♥ Promarkers #9 - Animals

Its time for a new challenge at I ♥ Promarkers! Pens at the ready, its...... Animals!
Nice and easy hey! The challenge is sponsored by the lovely Joanna Sheen, thanks Joanna x

For this challenge I've used an Image which is a freebie from Motivet. Coloured with cool grey promarkers and some pinks. I've glazed the flower with dimensional magic and gave a light sprinkle of glamour dust. Background papers are a steel grey card using the new daisies cuttlebug folder and I think Bo Bunny.

Pop over to the challenge and have a look at the rest of the girls fab DT's and join in the fun :)

Entering this into...

Sophisticats - Raining cats and dogs

Pollycraft - Open theme


Monday 5 April 2010

Crafty Cardmakers #18 - A Challenging Challenge

Aren't I mean hee hee! The challenge I've set over at Crafty Cardmakers is "A Challenging Challenge." I can see many people running away screaming from this one, some might be a bit curious and the hardened crafters will rub their hands with glee!

What the challenge is is to "Challenge Yourself" in that you need to use materials you haven't used, you know the type that sits around in the back of the drawers for years gathering dust? Or you can do a style outside of your norm, take part in a challenge past or present that you initially ran a mile from such as the more complex sketches or perhaps try a new card fold you keep meaning to try, its all about overcoming the fear and just getting stuck in.

For this challenge I bounced a few ideas around then whilst on a root for something else came across this Slide Mailer I bought from Katys Corner when it was on a corner so it must be around 2004/2005. I also bought the pens from there around the same time.

I've never done a slide mailer before, there were two in the pack and I still have another one (somewhere!) The pens are Marvy metallics which I think I've used to edge cards before but nothing more exciting!

I thought I'd photograph it along the way as if it turned out pants then I had a go and will learn from it so I've started by painting white gesso onto the chipboard mailer and when dry I gave it a light sanding.


Now using a non stick craft sheet I pressed the pens down to release some ink. Its worth noting that you don't need to do them too close together as it spreads quite a lot so I probably did them a bit close.


Me being me thought it would look quite nice with maybe a spritz of gold radiant rain so I sprayed a small amount on for good measure. I then gave it a quick spritz with water, you really don't need much with these.


Now at this point your guess is as good as mine as to how it's going to turn out so here goes! Place your mailer face down onto the ink then lift up and see what you get!


I quite liked the blue and pink so I dried it off with a heat gun and repeated until I got the effect and balance I wanted. Repeat this on all the surfaces.

Dry it all off with a heat gun or leave it to dry out/ With this one I'd sprayed some radiant rain nearby which had accidentally got on the inside, I wiped it with my hand and thought Oooh I likey that so left it :)
It's VERY messy but then I think my hands are in a permanent state like this as I think Jill's and Cath's are too as we're not glove people either!

Next I've coloured in two Sweet Pea stamps. As its a challenge all the sweet peas I've used are new to me and I've not coloured them in before. I used the microscope glass slide to draw round and cut them out adding some black ink at the edges.
I hit a bit of a snag here and was unsure how to mount the images without the glass falling out so help is always at hand at Katy's Corner yahoo group where I whipped over to and got some suggestions and went with dimensional magic to secure the glass to the image and then used glue dots to secure the images into the slide mailer.
Thanks very much for your help here ladies!
The two images are Soft Goth Night and Rising Flame available from Crafts and Me in the UK.

Now working on the front of the mailer I added another new sweet pea, one I was actually a bit scared of, well its the cat in the background I didn't like much as I don't dislike cats I'm just more of a bird person. I coloured Moonlight Whispering in and cut her out and attached to the front. The mask is coloured with sakura stardust pens so its very sparkly which doesn't show then I've used the ickle tiny fairies from Tracey Coates' Starburst Fairies stamp plate from The Stampman and stamped in brilliance white ink embossed with Moonglow Angel Wings peacock embossing powder before stamping the sentiment in brilliance black. This is a fun embossing powder which changes appearance depending on what ink or cardstock you use so its very subtle white with white ink on white and a really nice green over black cardstock.

Onto the back of the mailler and I've stamped the heart image from Tracey's new Artistic Elements stamp sheet embossed with Moonglow Midnight Teal embossing powder. I originally coloured the centre with shimmerz angel wings and gamour dust but it was BRIGHT white and didn't look right at all so I used the pink marvy marker and coloured over the glitter and added some dimensional magic on top.
And finally the inside where the two sweet pea images are mounted and I used the larger fairy group from Tracey's Starburst Fairies again embossed with the angel wings and stamped the sentiment across the middle with the little stars from the same sheet in the corners and then added some teal nail heads which is something I love as they come in long strips you just cut off however many you want :D
And thats job done, my first EVER slide mailer! Cath you really need to give me a swift kick at Port Sunny for not using these sooner lol!

I hope you come over and have a go at my challenge at Crafty Cardmakers as you never know what you might discover!

Sunday 4 April 2010

I kissed a girl and I liked it!

I simply could not resist doing this card! I can't help it, when I see something I get fixated on it until I express it and in this case it was the fantastic picture of Katy Perry getting gunged last week. I loved the colour clash and it wouldn't be colours I'd ever choose myself so I had to give it a whirl! Sorry for Katy but dang those colours look amazing hee hee!


I've used Wisteria purple blue starburst stains for the base and overstamped it with the solid and round circles from the new fabulous Alluring Ladies stamp sheet. The image is also from the same sheet (Isnt she fab!) and I've stamped with a purple and blue inkpad and embossed with moonglow hydrangea blue mauve embossing powder. The background is coloured with lime green promarkers (Lime zest, lime green and leaf green) with some added sparkle from a clear sakura stardust pen. The lips are also embossed with the hydrangea blue mauve.

Its a lot brighter in the flesh with lots of sparkle from the starburst stains and totally not my usual colour choice but I just HAD to do it!

Entering this into

Sketch Saturday - Sketch