Wednesday, 9 June 2010

Crafts & Me Challenge #6 - For friends or family

Challenge time again over at Crafts & Me and this time Amy has set the challenge "For friends or family" which should drop in nicely for fathers day cards too!
We're sponsored by Digistamp Boutique and I chose "Single Flower" image - honest it is lol!

For the background I used the flowerhead and enlarged, overlapped and greyed out then I've used larger and smaller versions of the flower to make a posy overlapping them and erasing the lines, I also erased the leaves as it was easier to see what I was doing then added them in at the end.

Its coloured with promarkers in purples and pinks although it doesnt look it, its all then coloured with sakura stardust pen in clear so its very sparkly. Ive stamped a sentiment stamp which I won on stampin for the weekend blog ages ago and I've added white ribbon, distressed the edges with worn lipstick and victorian velvet distress inks and added some flowers to the centres for more dimension and the edges to frame which I coloured with alcohol inks and iridescent gold glimmer mist.

Entering into...

Tuesday Taggers - All that blooms
A spoonful of sugar - Floral Delights
Charisma Cardz - Flowers (entry 2)
Paperplay - Flowers & Sparkle
Stamp Something - Digi day
Crazy challenge - Distress it


Hope you can come join us at Crafts & Me challenge! Thanks for looking :)

BTW there is a tutorial HERE that I wrote on merging digital images if you want to have a play. Works in PSP and other programs :)


Sunday, 6 June 2010

A card for a Princess

My Princess to be exact! Little Miss Moo is going to be 2 this month (Same day as my Nan!) and I thought for a while what I wanted to make as this is something that will be put away in her memory box. I've used Princess Tilda from Sir Stampalot, I really like the fairytales range!
I knew I wanted to make something a bit different and found it on Debbie Dolphins blog - A flip flap card or whatever its called lol! Here's Debbie's Card.

Next I went searching for the right text stamps and found them at Stamping All Day I've used 3 from there - Fairy Princess, May your dreams come true and Princess circle. I think these go really well with the Magnolia fairytales.

I'll try and explain as I go along how I've made it! I started with 3 cards size 5 1/2" by 5" and used stampin up whisper white cardstock as its quite thin (HIGHLY RECOMMEND for Promarkers!) so wont be as bulky when I start putting the layers on. Two of the cards I cut one side in half and glued these to the base card. Ive decorated completely with a new Stampin Up set called Cottage Wall. I was round Helen's the other day and asked if she had any nice, pretty, princessy papers and she brought out this new set which is one of the new colour ranges, I was actually thinking of doing this card in pink but I really like how these papers work together.

I've coloured Tilda with promarkers in pale lilacs (using the blender) and maroon & burgundy and added glamour dust with a glue pen to the gloves, underskirt & waistband. The crown I stamped with stazon onto holographic silver paper and paper pieced it and added sticky gems. The shoes I've given a coat of aileens paper glaze so they're shiny like patent leather.

With Tilda I learnt a new trick to place the image outside of the frame. A lady did email me a while ago with destuctions but I couldnt twig how to do it. I finally saw a video on you tube and as I'm a visual learner I clicked straightaway how its done - The video is here.
I've used Nesties labels 4 and edged that with victorian velvet distress ink.

Flowers are all from hobbycraft and the leaf is a woodware punch (grass) I've given all of it a spray of glimmer mist (pearl) so its got a subtle sparkle.

On the inside I've repeated the Tilda and punched it out with a circle scallop punch, the reverse of that I've put the Princess circle stamp and paper pieced the crown with the silver holographic paper. I've made another circle to match the front and used some lace to make a border and added a picture of my little Princess, stamped some number 2's and the may all your dreams come true. On the other side of the flap I've put Molly in sticky letters and covered with silver holographic glitter.

The borders down the middle of the front and on the edge of the flaps is a martha stewart doily lace punch.

This card took almost 2 days to make, well inbetween the kids and whatnot but it was a looooong time but my princess is worth it :D


Entering this into...

Just Magnolia - Lace borders (On the circle on the inside)
Sir Stampalot - Punches (2nd entry)
Sketch Saturday - Sketch (Hope it counts as its the one I followed!)
Ooh la-la - Colour Inspiration
A Spoonful of Sugar - Celebrations
Pollycraft - Hidden Message

FRONT OF DESIGN


INSIDE WITH BOTH FLAPS CLOSED

INSIDE WITH BOTH FLAPS OPEN
CLOSE UP OF MY PRINCESS!

BACK OF THE CIRCLE ON INSIDE.

Thursday, 3 June 2010

Sweet Pea - Koi

Last night I was thinking I need to do my DT card for this week for Crafts and Me and had a rummage through my stamps. As I was a bit pushed for time I thought I'd go for one of the easier designs and for some reason my mind wandered off track and I picked up Koi which is one of the newer stamps in the range and one of the more challenging! I do like a challenge though lol! I think if I chose a wider range of colours it would be easier but I was sticking to an orange/yellow theme so had to think a bit to get a good contrast!

I've coloured her with promarkers and accented with sakura stardust pens. I used the blender pen quite a lot with this one to get the effects on her tail and clothes. The actual Koi and her tail I've painted with glossy accents and added glamour dust on the tail.
The ribbon I've coloured using a matching promarker (amber) and the background is starburst stains bachelor button blue which I've used a puddling technique so it looks like water. The little tag stamp can be found here.

Entering into...

Cute Card Thursday - Orange, blue and black

Charisma - Flowers

Quixotic - Go Wild (There is a fish there lol!)

Right-o I'm off on my first bike ride of the year, wish me luck lol! The kids love it so we're going down the trans pennine to grab some tea!


"KOI" can be purchased via Crafts & Me in the UK. Thanks for looking!

Tuesday, 1 June 2010

Jill said "Hey Vix, how'd you fancy...."

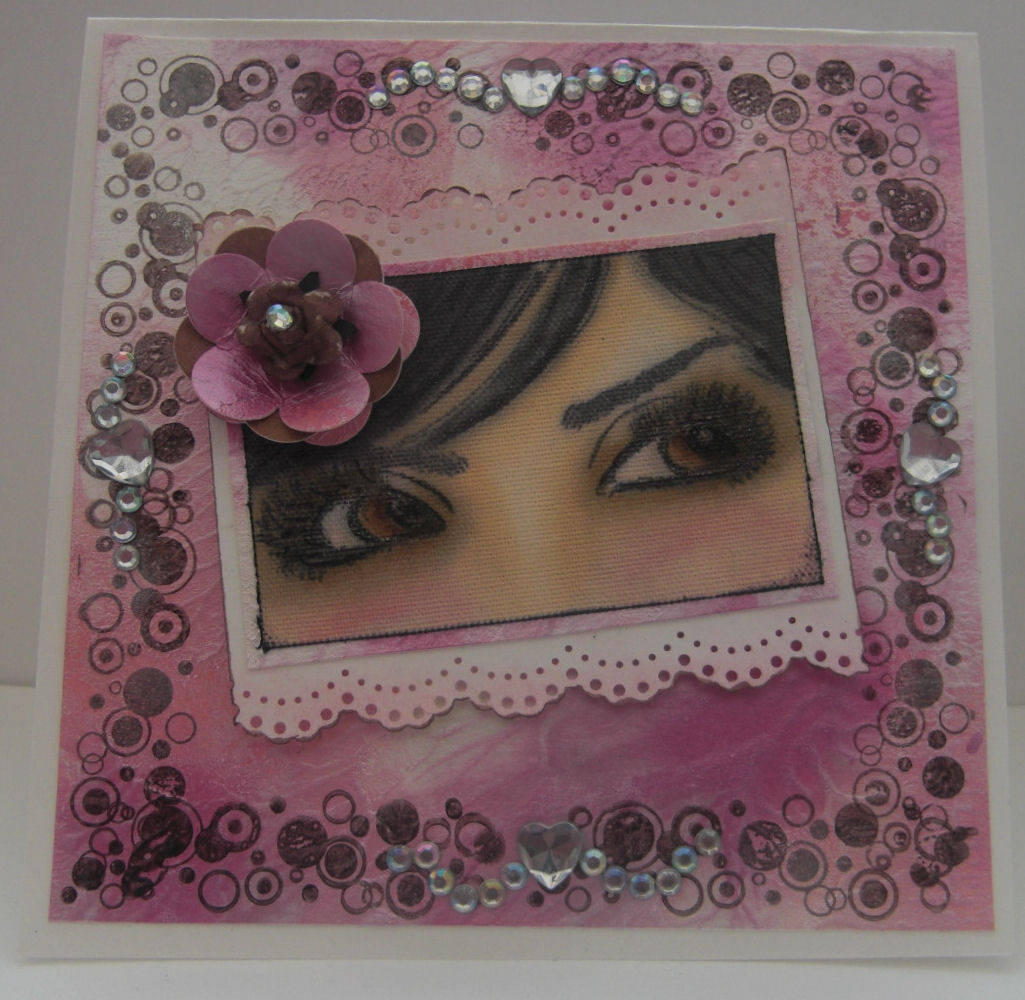
Jill from The Stampman likes to challenge her brood from time to time and this time as I was helping pack up following Port Sunny Jill says, "Hey Vix, how'd you fancy having a play with this?" and hands me a packet. The packet is some 12x12 sheets of Claudine Hellmuth sticky back CANVAS. Canvas I ask you!! Jill says maybe play with your starburst stains offering some helpful advice....


Yesterday I had a bit of a rampage and tidy up and I like feeling new and fresh around the house and I took out a sheet of this sticky back canvas and thought Hmmmm, hmmmm. Had a quick flick round some challenges to inspire me and decided I wanted to use my promarkers but not only that to colour "The Eyes" in skin tones as well I'm challenging myself using something new so I think I'm pretty good at colouring The Eyes in greyscale and have never actually tried it regular colours yet. Now to do The Eyes the way I do it requires a huge amount of the blender so this was no different only normally I use whisper white cardstock which lets the colours float around a bit so I can manipulate them, on canvas it doesn't, put a promarker on and it spreads like wildfire so I just adjust the way I colour to allow for the different surface. Its quite stiff so you can punch it and shape it too so watch this space for more playing with it!

And as I was in one of "those" moods I also made the background with luna lights paints I've had forever and overstamped with one of the bubbles stamps from the same set as the eyes (Alluring Ladies by Tracey Coates available at The Stampman)
I was actually going to layer and whatnot but once I'd done the stamping on the luna lights background I thought it looked quite sweet as is :)

So the image is indeed coloured with Promarkers on canvas using the blender pen and also some help from adirondack blending solution, I've also used sakura stardust pens in black and clear and smudged them. The flower is made from leftover luna light background and moonshadow ink punched out and I've used a Martha Stewart punch on some white card sprayed with iridescent gold glimmer mist. Added some sparkly hearts and gems (the hearts are from the papermill)

So Jill did I pass the challenge (Blows raspberry!)

Entering into...

Sir Stampalot - Punch It
Mixed Media Monday - Personal symbols & myths
One Stitch at a time - Something new
Crafty Creations - Favourite Stamp


Vixykins does CUTE

Oh yes she does (sometimes shhhh!) I got asked to do a Christening card so made this. Image is a forever friends bear coloured with promarkers. It actually took me 5 minutes to colour which is bizarre for me given I usually spend an hour or two but it was ready in 5! The flowers I coloured with sakura stardust pens and I've used an old favourite divine swirls cuttlebug embossing folder and my new labels 4 nesties which I got from Jill at The Stampman. Text is computer generated and both that and the image are edged with distress ink in chipped sapphire and weathered wood.


Entering into

Crafty Catz - Boys (Its a christening card for a boy)