Showing posts with label tracey coates. Show all posts

Tuesday, 1 June 2010

Jill said "Hey Vix, how'd you fancy...."

Jill from The Stampman likes to challenge her brood from time to time and this time as I was helping pack up following Port Sunny Jill says, "Hey Vix, how'd you fancy having a play with this?" and hands me a packet. The packet is some 12x12 sheets of Claudine Hellmuth sticky back CANVAS. Canvas I ask you!! Jill says maybe play with your starburst stains offering some helpful advice....


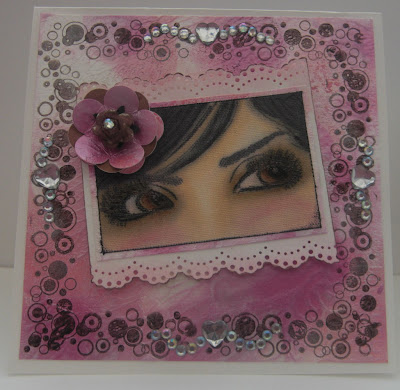
Yesterday I had a bit of a rampage and tidy up and I like feeling new and fresh around the house and I took out a sheet of this sticky back canvas and thought Hmmmm, hmmmm. Had a quick flick round some challenges to inspire me and decided I wanted to use my promarkers but not only that to colour "The Eyes" in skin tones as well I'm challenging myself using something new so I think I'm pretty good at colouring The Eyes in greyscale and have never actually tried it regular colours yet. Now to do The Eyes the way I do it requires a huge amount of the blender so this was no different only normally I use whisper white cardstock which lets the colours float around a bit so I can manipulate them, on canvas it doesn't, put a promarker on and it spreads like wildfire so I just adjust the way I colour to allow for the different surface. Its quite stiff so you can punch it and shape it too so watch this space for more playing with it!

And as I was in one of "those" moods I also made the background with luna lights paints I've had forever and overstamped with one of the bubbles stamps from the same set as the eyes (Alluring Ladies by Tracey Coates available at The Stampman)
I was actually going to layer and whatnot but once I'd done the stamping on the luna lights background I thought it looked quite sweet as is :)

So the image is indeed coloured with Promarkers on canvas using the blender pen and also some help from adirondack blending solution, I've also used sakura stardust pens in black and clear and smudged them. The flower is made from leftover luna light background and moonshadow ink punched out and I've used a Martha Stewart punch on some white card sprayed with iridescent gold glimmer mist. Added some sparkly hearts and gems (the hearts are from the papermill)

So Jill did I pass the challenge (Blows raspberry!)

Entering into...

Sir Stampalot - Punch It
Mixed Media Monday - Personal symbols & myths
One Stitch at a time - Something new
Crafty Creations - Favourite Stamp


Monday, 19 April 2010

Crafty Cardmakers #19 - Desert Island

Oooh another toughie from me at Crafty Cardmakers hee hee! Imagine if you were to be stranded on a desert island for at least 6 months. What items would you absolutely *need* to take with you, what wouldn't you grow bored of? The thought behind it is to help newer crafters make some choices on whats REALLY useful and a sure fire winner for their hard earned pennies. We're faced with so many choices but where would a newer cardmaker start given the huge array of products? If you wanted to start cardmaking what are essentials?
I will be compiling a hot list at the end of it based on entries so if you're more experienced please do come and play as your input is very valuable!


So what would I take?

I think for me it absolutely has to be starburst stains. I love the shimmer and the way they all come out unique when making backgrounds. I don't feel a desperate need for printed patterned papers, they're nice but I do prefer my own.


I would also need flowers, I love prima flowers and paper roses.

Also ribbon especially white satin as I can colour it with my promarkers which are an absolute must for me to take and I just love sticky gems and pearls, so much easier nowadays instead of fiddling with glue with the non sticky ones.

Stamp wise most definately the butterfly beauties stamp plate with The Bling Maiden as there are so many possibilities I'd never get bored. Also embossing powder, I love moonglow midnight embossing powders which are black but change colour (I've used midnight teal here) I've also used a woodware leaf punch which is a firm favourite and cuts card easily.


Brilliance ink is another must for me, it can be embossed, dries on most surfaces and has a lovely shimmer and finally stickles glitter glue as its high quality and dries 3d instead of the glue seeping into the paper and most of the sparkle disappearing.

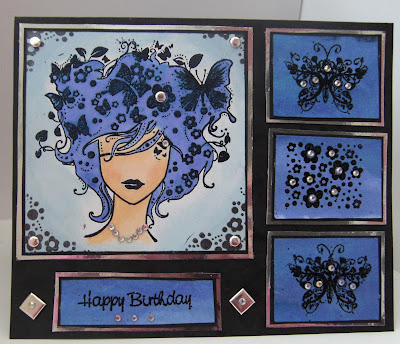
I've made this card using starburst stains in bachelor buttons blue and french lilac violet and swiped across the blue with black brilliance ink. Image is stamped and embossed with moonglow midnight teal and I've coloured the face with promarkers and watercoloured the hair with starburst stains in frosted forget me nots, baby blue eyes and tibetian poppy teal. I've added lots of sticky pearls and iridescent gems and some white paper roses swiped with brilliance sky blue and added stardust stickles glue for sparkle. The leaves I've made by swiping the brilliance blue onto card and punching with a woodware punch (1.5" grass)

I do hope you'll come and join us at Crafty Cardmakers and show us your absolute favourite must haves!

Also entering for...

ABC Challenges - Sparkle
Penny's - Anything goes
My Time to Craft - Pearls (2nd entry)
Cute Card Thursday - Touchy Feely
Flutterby Wednesday - 2nd Entry


Thursday, 8 April 2010

My Arty Journal Page

I've been pondering over this art journal page for a couple of weeks now and originally I tried doing it in acrylics as that seems the done thing and I struggled. I realised what was bothering me was the materials, they weren't ME. I couldn't express something as personal as an art journal page using things that were impersonal to me so I ditched it and went with what I know and what works for me whether thats conventional or not because I'm not the most conventional of folk.

In this case I went with distress inks, a splash of moonshadow, a misting of radiant rain, a splodge or two of gesso and good old ink.

What did I want to write about is my next challenge and following the thought of changing materials as they were more me I went with how others may view me and how I view myself so I've stamped the eyes from Tracey Coates' Alluring ladies sheet which is of course from The Stampman. I use this as a blog header as its distinctive and it took me an hour to colour and I'm very pleased with the result :)

I've used distress inks and moonshadow ink to colour the page and swiped some gesso here and there and added a band of an old book gessoed and distressed across the centre. After I stamped and embossed the eyes I left it for a bit of pondering and the words from the same stamp sheet were jumping out at me and I thought well I don't have ANY of them! Anyone who actually knows me personally (and only the very brave few stick me out!) will agree I'm not in the slightest bit elegant, graceful, glamourous, don't have flair and most certainly don't have any sense of style.
My favourite shoes are black CAT boots which are a bit like steel toe caps without the steel. OK I've added bright pink laces to mine.
I've reflected this by using Helitrope purple plum starburst stains (From the Japanese gardens set) which is like a hot pink with a purply tint. The embossing is midnight teal, another firm favourite. I've also added the flying heart from the Artistic Elements sheet because I think its just fabulous and reflects my love of art & craft and the sentiment is also from there.
So here's a little page about me and my unconventional self complete with sparkly bits :)


Sunday, 4 April 2010

I kissed a girl and I liked it!

I simply could not resist doing this card! I can't help it, when I see something I get fixated on it until I express it and in this case it was the fantastic picture of Katy Perry getting gunged last week. I loved the colour clash and it wouldn't be colours I'd ever choose myself so I had to give it a whirl! Sorry for Katy but dang those colours look amazing hee hee!


I've used Wisteria purple blue starburst stains for the base and overstamped it with the solid and round circles from the new fabulous Alluring Ladies stamp sheet. The image is also from the same sheet (Isnt she fab!) and I've stamped with a purple and blue inkpad and embossed with moonglow hydrangea blue mauve embossing powder. The background is coloured with lime green promarkers (Lime zest, lime green and leaf green) with some added sparkle from a clear sakura stardust pen. The lips are also embossed with the hydrangea blue mauve.

Its a lot brighter in the flesh with lots of sparkle from the starburst stains and totally not my usual colour choice but I just HAD to do it!

Entering this into

Sketch Saturday - Sketch

Friday, 2 April 2010

Very Vintage

I've gone all vintage today wanting to play with my distress inks and moonshadows :) Made some backgrounds yesterday so I chose a nice area of one I'd used greens, red and brown distress inks on and stamped the keys from Tracey Coates' new "Artistic Elements" sheet and embossed with Moonglow Midnight emerald. I've painted inside the two outer keys with a yellow H2O paint to make them stand out and stamped some swirls in the corner which are actually part of the flying heart off the same sheet.
I've attached a chain to the sentiment at the bottom which are two stamps from the sheet, mos of the sentiments can be used inside this frame. I've mounted the top panel on 3d foam so that the sentiment moves and I've also added a little key charm painted with alcohol inks to blend in more.
The bottom pic shows the card tilted and the moonglow effect, midnight embossing powders are black but change colour when tilted so this one is midnight emerald. The stamps in this set can be seen further down the post.


vix

Saturday, 27 March 2010

The Stampmans new Alluring Ladies

Here's another one from the new Alluring Ladies sheet designed by the fabulous Tracey Coates available from The Stampman. I love this sheet, its so diverse and I can see this stamp becomming a favourite - So many backgrounds, so many embossing powders to play with!

I'm really in a starburst stains mood lately, not that I'm ever not but moreso! I've stamped and embossed with Midnight Sapphire embossing powder over a background I made using Mountain Lavender Gold and Frosted Forget Me Nots from the Icicle creek starburst stains set. The scrunch background is made with the same colours.
I've used baby blue eyes from the May Day Meadows set on card and then used the new Jules Jewells cuttlebug folder to make the two panels.

I've added green sparkly highlights with light and dark green sakura stardust pens and added some prima wildflowers.

I can see this one bringing me hours of fun with all the colour combos you can do :D


Thursday, 25 March 2010

The Stampmans new Glamour Lady

Here's the Glamour Lady from The Stampman's new plate designed by Tracey Coates. She has a solid dress so you can have a lot of fun with embossing powders, foils, glitters and imagination.

I never know what colour mood I'm going to be in on any given day and todays mood is blue and lavender so I used my Starburst Stains from the Icicle Creek set which are a wonderfully pale collection as I wanted a strong contrast with the dress. I made a scrunch background and covered a blank card base. To flatten this out more use a wetish glue like pva or a pritt stick and push the crinkles down. I then used a piece of black card embossed with the new Jules Jewells embossing folder for the lower half.
I used the icicle creek set again to make a piece of card to stamp on, I do this by puddling the Starburst stains so just paint a base coat on of any colour starburst stain and add blots of other colours and use your heat gun to push the colours around. This will give you a nice flat surface to stamp directly onto.

I stamped and embossed the Glamour Lady with moonglow midnight sapphire embossing powder (These really are gorgeous powders!) and I've restamped the lady separately using a glue pad and added glitter, cut it out and stuck it over the embossed one. I've edged round with a light and dark blue and overstamped again with the dark blue using the fab circles you get on the plate in the corners.

On the dress I've added some feathers which come with a gem and the flap on the dress is a prima flower folded over so it sticks up a bit. I shaded the lady in with a skin toned promarker.

Hope you check out Traceys new sheet over at The Stampman as you get so many stamps in this set to use (the sentiment is also from it) and a range of styles too.


Wednesday, 3 March 2010

The many faces of the Bling Maiden

I had some swaps to finish off and turned to my bestest friend for help - The Bling Maiden! I got to thinking of how many times I've actually used this stamp and the other stamps on the sheet and its a.....LOT! She is just so versatile and you can dress her up or not and use so many mediums with her and every one looks different.

I thought I'd show several of them so you can see just how different she looks with various mediums and even better is that you can colour her in 2 minutes or take more time and she'll look fab eitherway! You can use as little or as much embellishment as you like and use any medium, you dont need anything fancy to make this stamp look fab!

The Bling Maiden is available on an unmounted plate called Butterfly Beauties via The Stampman.

I know several of you have bought this from Create and Craft or the stampman so if you get her home and inspiration flies out of the window then have a browse and see how easy she is to colour! I hope you can get some inspiration and not be afraid to use her :)
COLOURED WITH PROMARKERS

STAMPED ON SCRATCH ART SHEETS USING METALLIC INK, HEATED AND THE INK RUBBED OFF TO REVEAL THE RAINBOW UNDERNEATH.
STAMPED AND EMBOSSED WITH STAMP N STICK THEN ADDED MULTI COLOURED FOILS.

STAMPED AND EMBOSSED WITH HOLOGRAPHIC EMBOSSING POWDER WHICH IS MULTI COLOUR. COLOURED WITH PROMARKERS AND A BLENDER PEN TOWARDS THE OUTTER EDGE.

STAMPED AND COLOURED WITH TWINKLING H2O'S

BLING MAIDEN CLOCK! STAMPED AND EMBOSSED WITH HOLOGRAPHIC EMBOSSING POWDER AND COLOURED WITH STARBURST STAINS.

STAMPED AND EMBOSSED WITH HOLOGRAPHIC EMBOSSING POWDER AND COLOURED WITH STARBURST STAINS.

AS ABOVE


STAMPED AND EMBOSSED DIRECT TO HANDMADE BACKGROUND OF STARBURST STAINS AND RADIANT RAIN. STAMPED AGAIN AND BRAYERED INK ON AND EMBOSSED HAIR WITH CRYSTAL EMBOSSING POWDER.


STAMPED ONCE ONTO BACKGROUND THEN STAMPED ON ACETATE AND ADDED GOLD LEAFING FOIL AND ATTACHED. PAPER PIECED FACE.


HANDMADE INKY BACKGROUND (STARBURST STAINS AND RADIAN RAIN) STAMPED & EMBOSSED DIRECTLY ONTO BACKGROUND AND PAPER PIECED THE FACE.

Sunday, 3 January 2010

More cards from The Stampman show

If you're looking for The Stampman blog hop just scroll a bit further down or click here!

Finally getting round to showing some more cards from the stampman show from 28th Nov. Hopefully santa may have delivered some starburst stains for you so I hope I can show you some of the different ways to use them!


CARD 1

I've stamped and embossed the bling maiden from the butterfly beauties stamp set and coloured the skin with promarkers then I've use Wisteria purple blue
to paint the hair and used some to make panels and stamped the smaller stamps from the set. Mounted on silver mirri board and I've edged round the image with a blue ink using some cut n dry foam.


CARD 2

This is such a lovely colour - opal sea oats from the Mermaid sea shells set of starburst stains. I've used it on the base of the easel and the background panel. The bling maiden this time has been stamped on acetate then I cut the hair out, added some double sided sticky then the gold leafing and added it on top of a previously stamped image so the hair is gold leafed. I also used strips of double sided sticky around the edge and added more gold leafing.

CARD 3
Well its not a card lol! Its a notebook I made Jill using the Japanese Gardens starburst stains. I used the Black orchid silver for the base of the book and painted the bling maiden with helitrope purple plum (yum yum!) I've embossed some swirls in the corner with razzleberry plum moonglow EP

CARD 4
This is one of my favoured gatefold cards using the Sea mint green from the mermaid seashells set. The panel on the front is made with the starburst fairies stamp set stamped on acetate and embossed and gold leaffed on the back. The inside I used the sea mint green doing a scrunch technique and the panel is also from the fairies sheet stamped with stazon timber brown onto acetate and gold leaffed. The tiny fairies are embossed.


Monday, 16 November 2009

Crafty Cardmakers 9 - As clear as day

Oh yes we have another challenge for you over at Crafty Cardmakers. This time it is to use something clear, transparent, translucent or see through. It doesn't have to stay see through but it should start life as such i.e. acetate you coloured with inks. There is the easy road of course where you can opt for something simple like clear sticky gems but who wants simple? OK I know some folk do but Crafty Cardmakers is a learning resource (hopefully ha!) so its as much about challenging yourself!


The girls have done some fabulous and inspired works over there so pop over and give them some loves :D

Here's my creation for it and dah dah daaaaaah I finally did an easel card. Its one of those "Is that IT?!" moments when you make the base as its soooooo simple! Amanda who's my DT teamie over at Dewdrop Craftz has made an easy picture tutorial here but the rule of thumb is fold whatever size card you make in half and then fold the back of the card in half so it touches the centre to make your mountain fold. If you made a 5"x5" card then you need a piece of card 5"x5" extra to make your design on and simply glue this onto the fold.

Papers are printouts from Bearly Mine designer extreme volume III then I have stamped Tracey Coates' butterfly from the butterfly beauties plate in the middle of a piece of acetate and stamped the edge of the smaller butterfly in the corners. I flipped it over and used glue to add some glamour dust to the back of the butterflies and corners and waited a long time for it to dry lol! Once dry I attached this panel over the card (which has the DP's on) using brads and hung a butterfly charm from the corner. The pink gems are nailheads I got from the stampman, they come on a sheet and you simply cut off how many you want so no messing round lining thisngs up. They're actually more like flat pinheads but are a lovely metallic colour.

The butterfly at the bottom was made by swiping a brilliance tri colour inkpad (Twilight) across some card and stamping the butterfly twice and mounting it 3d. I was thinking of doing these as acetate or shrink plastic but had a few issues and coz I've been ick ick I just went with the brilliance ones so I could go back to bed :D


Many thanks for looking!

Sunday, 8 November 2009

A modern vintage

Time for some vintagy type stuff me finks! I love walnut and sepia inks but ones that change colour oooooh! Oh yes that would be Moonshadow inks! Not seen them well come have a looksie :D

Moonshadow inks are walnut inks with added mica shimmer so depending on what way you look at them they may appear brown or another colour like fuchsia, cool huh!

I'm entering this into the following challenges:

Lots to Do - Distressed

Created by Hand challenge - Times gone by

Whimsical Ink - Butterflies

My Time to Craft - So many Scallops


Well this is a gatefold card (Yes I know I like them and I promise I will try an easel card this week!) The front panels are cuttlebugged moonshadow phantom fuschia which from this angle look brown. They are mounted on starburst stains helitrope purple plum. I made the lollipop flower with the same colours distressing the edges with scissors and swiping some white acrylic. The centre button is the small butterfly from Tracey Coates' Butterfly beauties set which is made with shrink plastic inked brown then stamped in silver.

Opening the card and you will find the same panels to the sides and the image is the large butterfly from Tracey's set which was stamped and embossed with moonglow silver moon sapphire EP onto a panel I made using moonshadow inks in Phantom Fuschia and Tawny Turquoise (which I'm totally in love with!)

I used a puddle method to get all the swirls in the colour. Basically you use a decent weight cardstock (300gsm) and paint the surface with one colour then drop big puddles of another and blast with a heatgun. This pushes the colours around in swirls so you can move your heatgun further away if you want a puddle in that place or move it closer to spread it out more. Add drops of the 2 colours as you go along until you're happy then stamp on it :)

You can now see the colours properly here, brown is now turquoise and fuschia, fabulous! I love colour change things I does hehe!


Thanks for looking x

Friday, 6 November 2009

Flutterby Wednesday

I likes this blog I do! Flutterby Wednesday are asking simply for you to create a card with a Fairy or butterfly on (or an angel!) so I can't give that one a miss as angels, fairies and flutterbys are quite up my street :)
Photo isnt so good as the colours are really subtle but the image is part of the Tracey Coates plate (Yes its a new toy and I likes it a lot hehe!) I stamped in brilliance Peacock which is a blue and green pad and embossed with crystal embossing powder so its a bit sparkly. The mount card I used the brilliance pad and swiped across so it would match the front. I cut the image into 4 and mounted onto black card. The charm at the bottom is made with black shrink plastic.
Thanks for lookin