Well haven't I been a naughty blogger! My new years resolution in tatters lol! I just couldnt get on blogger last night and was in so much pain anyway I just scribbled away furiously instead :( Back to the Drs on friday unless I ring at 8am tomorrow and try and grab a book on the day one, I hope so as the tablets he gave last week are about to run out eeeek! Not that they *do* anything anyway but its a comfort thinking they might ease it off a little.
Got 2 cards to share with you tonight. The first one is for Passion for Promarkers DT and the challenge is For a female relative/Mum. I wanted to print a mothers day sentiment for this one but I completely ran out of card, not one sheet left so have been up to Strikes today and had a scribble on some of theirs and got one suitable for the digi papers I print and one suitable for colouring work. I hope Letraset bring out that gorgeous new card they have in their new stamp packs soon as I'm itching to get hold of some more of that, its like silk and blends beautifully!
Crafty Emma's Store is sponsoring this week with a £10 voucher to spend there so rmember to use your promarkers/flexmarkers/tria or aquamarkers to be eligible!
For this I used a recently acquired Tilda stamp called Tilda spreading love and she's actually throwing hearts around but I thought that a bit valentineish so I used flowersoft instead. I chose a turquoise colour theme as I didnt want it to appear too weddingish either lol! I added a little heart charm to the bow (that really helps set it aside from valentines/weddings....!) and the making memories cherish border (Oh dear, blame the medication!) and a heart shaped doily (OK I'm amusing myself now!) The papers are floral fantasy by Crafts and Me and I used some ancient button brads with some turquoise prima flowers.
I'd like to enter into...
Kaboodle doodles - Flowers
Stamps & Fun - One bow
Magnolia down under - buttons & bows
One stop craft - Button it
Crafty Emmas - Flower Frenzy
Next up is Crafts & Me and our challenge this week is Things with Wings. Naturally as the shop is FULL of winged fairies, angels and creatures I selected a stamp that hasnt got wings only because I really really love Melody and wanted to colour her :) This one is Fashion Melody by Lemon Shortbread. I saw the rest of the DT had naturally gone with images that are fairies/angels so got a bit nervous but then Mona piped up that she was using Cali Girl which isnt either so safety in numbers ha!
As I'd run out of card for printing on I had a rummage through the ones I'd already printed off from the Floral Fantasy paper pack and went for one with hot pink flowers on which isn't a colour you'll see here too often, I do like to push the boat out sometimes :) I wanted to keep this pretty simple mainly because I'd also run out of glue dots so flowers were out of the question but with papers like this in the background you dont *need* a lot of embellishment as the paper does the work for you. I used some letratac to attach the butterflies :)
This particular paper has gorgeous hot pink flowers with some violet tones in the bottom corner so I picked those colours out and scribbled away adding a fold here and there and punched out little violet and holographic silver flowers for her brooch and added punched butterflies and some pink gems and 2 diddy pearls on her pockets. The sentiment is from a stampman sheet and its matted on violet and holographic silver card.
I'd like to enter this into...
Pan Pastel UK - Stamped image
Papertake - Anything goes
That craft place - Anything goes
Showing posts with label just magnolia. Show all posts
Wednesday, 7 March 2012
Friday, 12 November 2010
Birthday sale & New release at Bearly Mine Designs
Its Donna's Birthday today over at Bearly Mine Designs and she is having a sale on all of her amazing digi sets and CD's from today until 19th Nov. She is also celebrating her new release digi set Christmas Dreams, these are stunning!I've used Donna's digi papers for over a year now and the advantage I get from them is they are unlimited. I tend to make my inserts when the card is ready to be dispatched somewhere which may be quite soon or a while after I've made it and I never have any trouble looking for a piece of matching paper to go on the inside and finding I've run out, I just print another one off - simples!
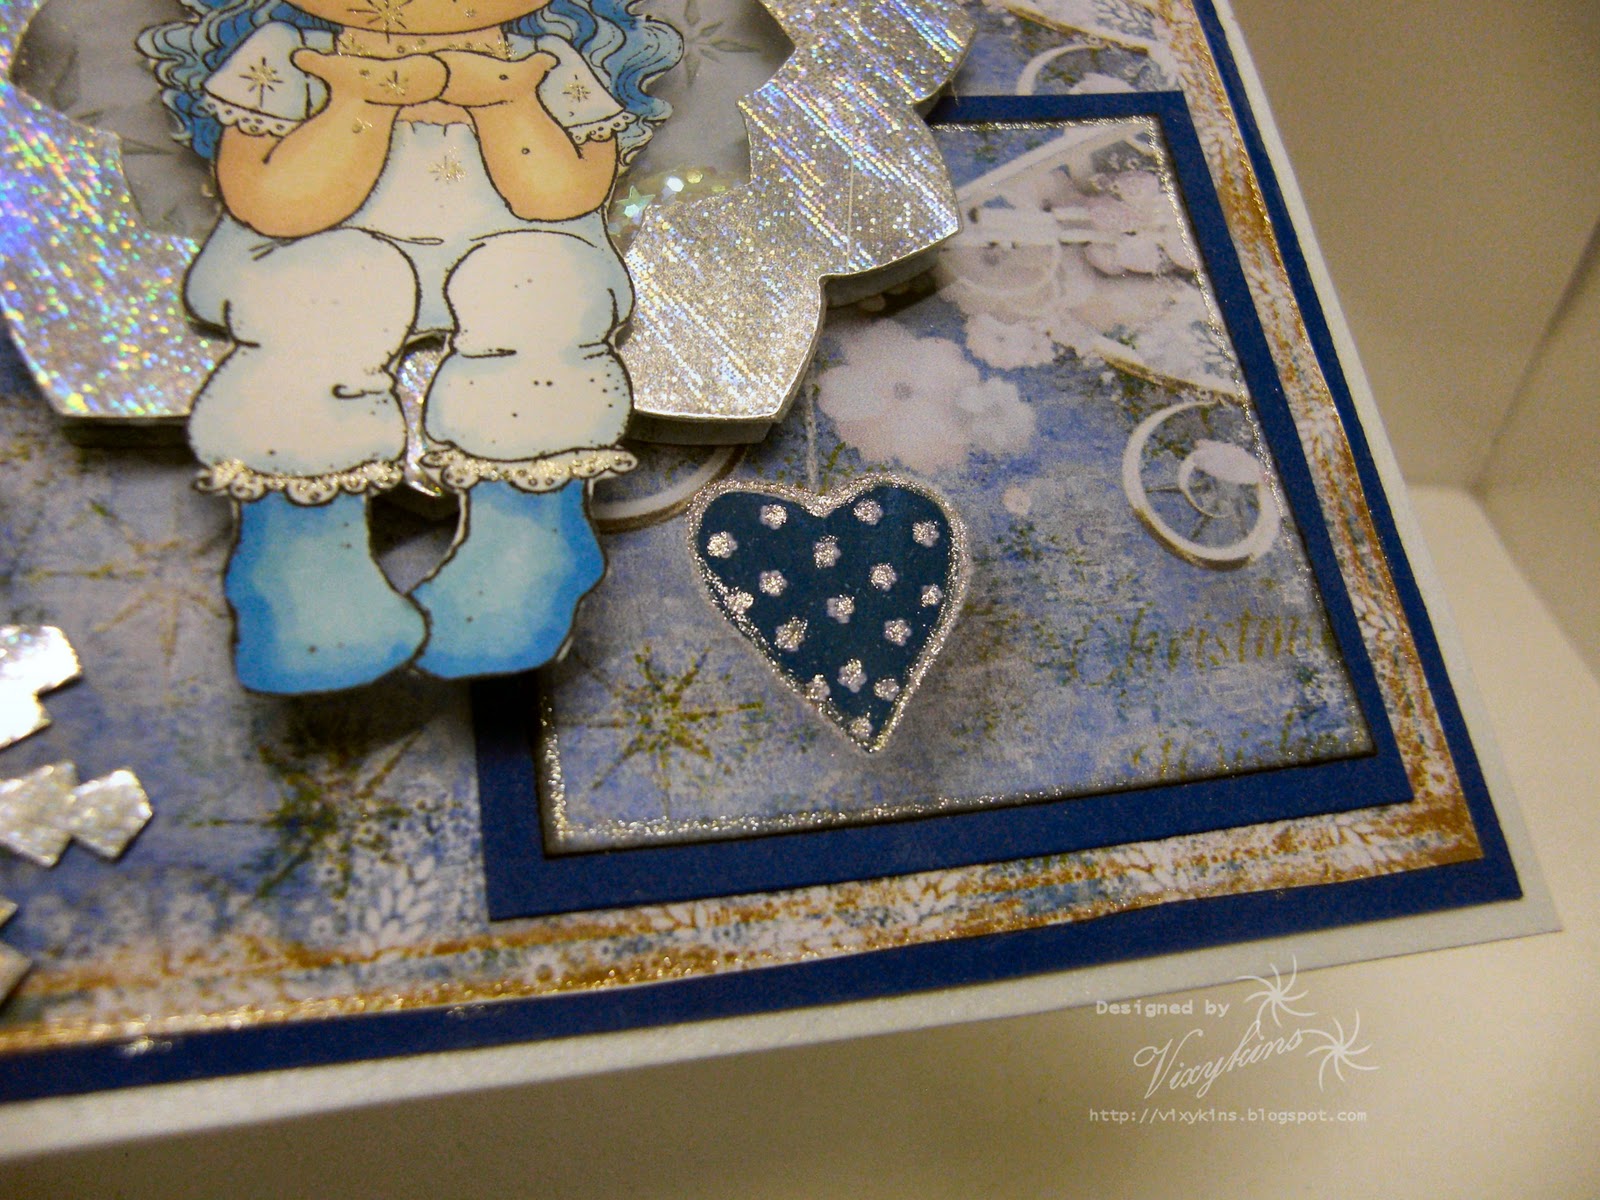
The card I've made today I used one of the papers from the new Christmas Dreams set which has the most beautiful hanging heart but it seemed such a shame to cover it so I've used a sheet as the backing then cut 2 squares out of another sheet and layered these over the top so the heart shows again :D
I've coloured Tilda with promarkers using cool aqua around the edges of the clothes and the blender pen to get the really pale shade with added sparkle on the lace on the clothes, stars and around the edges of the backing and squares and the heart. She's sat on a shaker I made with a Nellie Snellen die, I've no idea why I made a shaker as I'm usually rubbish at them but the mood struck!
Anyhow I'm entering this into the following challenges:
Totally Tilda - Icy Christmas Tilda
I Love Promarkers - Icy Colours (Entry #2)
Creative Belli - Old, New, Borrowed, Blue (Old - the glitter snow in the shaker which is about 6 years old! New - The new release DP's, Borrowed - Tilda stamp borrowed from Ms Dolphin, Blue - yep!)
ABC Christmas - Winter Wonderland
A Spoonful of Sugar - Snowflakes
Paper Sundaes - Let it Snow
Crafty Calendar - Winter Snowflakes
Thanks for looking!
Sunday, 6 June 2010
A card for a Princess
My Princess to be exact! Little Miss Moo is going to be 2 this month (Same day as my Nan!) and I thought for a while what I wanted to make as this is something that will be put away in her memory box. I've used Princess Tilda from Sir Stampalot, I really like the fairytales range!
I knew I wanted to make something a bit different and found it on Debbie Dolphins blog - A flip flap card or whatever its called lol! Here's Debbie's Card.
Next I went searching for the right text stamps and found them at Stamping All Day I've used 3 from there - Fairy Princess, May your dreams come true and Princess circle. I think these go really well with the Magnolia fairytales.
I'll try and explain as I go along how I've made it! I started with 3 cards size 5 1/2" by 5" and used stampin up whisper white cardstock as its quite thin (HIGHLY RECOMMEND for Promarkers!) so wont be as bulky when I start putting the layers on. Two of the cards I cut one side in half and glued these to the base card. Ive decorated completely with a new Stampin Up set called Cottage Wall. I was round Helen's the other day and asked if she had any nice, pretty, princessy papers and she brought out this new set which is one of the new colour ranges, I was actually thinking of doing this card in pink but I really like how these papers work together.
I've coloured Tilda with promarkers in pale lilacs (using the blender) and maroon & burgundy and added glamour dust with a glue pen to the gloves, underskirt & waistband. The crown I stamped with stazon onto holographic silver paper and paper pieced it and added sticky gems. The shoes I've given a coat of aileens paper glaze so they're shiny like patent leather.
With Tilda I learnt a new trick to place the image outside of the frame. A lady did email me a while ago with destuctions but I couldnt twig how to do it. I finally saw a video on you tube and as I'm a visual learner I clicked straightaway how its done - The video is here.
I've used Nesties labels 4 and edged that with victorian velvet distress ink.
Flowers are all from hobbycraft and the leaf is a woodware punch (grass) I've given all of it a spray of glimmer mist (pearl) so its got a subtle sparkle.
On the inside I've repeated the Tilda and punched it out with a circle scallop punch, the reverse of that I've put the Princess circle stamp and paper pieced the crown with the silver holographic paper. I've made another circle to match the front and used some lace to make a border and added a picture of my little Princess, stamped some number 2's and the may all your dreams come true. On the other side of the flap I've put Molly in sticky letters and covered with silver holographic glitter.
The borders down the middle of the front and on the edge of the flaps is a martha stewart doily lace punch.
This card took almost 2 days to make, well inbetween the kids and whatnot but it was a looooong time but my princess is worth it :D
Entering this into...
Just Magnolia - Lace borders (On the circle on the inside)
Sir Stampalot - Punches (2nd entry)
Sketch Saturday - Sketch (Hope it counts as its the one I followed!)
Ooh la-la - Colour Inspiration
A Spoonful of Sugar - Celebrations
Pollycraft - Hidden Message

I knew I wanted to make something a bit different and found it on Debbie Dolphins blog - A flip flap card or whatever its called lol! Here's Debbie's Card.
Next I went searching for the right text stamps and found them at Stamping All Day I've used 3 from there - Fairy Princess, May your dreams come true and Princess circle. I think these go really well with the Magnolia fairytales.
I'll try and explain as I go along how I've made it! I started with 3 cards size 5 1/2" by 5" and used stampin up whisper white cardstock as its quite thin (HIGHLY RECOMMEND for Promarkers!) so wont be as bulky when I start putting the layers on. Two of the cards I cut one side in half and glued these to the base card. Ive decorated completely with a new Stampin Up set called Cottage Wall. I was round Helen's the other day and asked if she had any nice, pretty, princessy papers and she brought out this new set which is one of the new colour ranges, I was actually thinking of doing this card in pink but I really like how these papers work together.
I've coloured Tilda with promarkers in pale lilacs (using the blender) and maroon & burgundy and added glamour dust with a glue pen to the gloves, underskirt & waistband. The crown I stamped with stazon onto holographic silver paper and paper pieced it and added sticky gems. The shoes I've given a coat of aileens paper glaze so they're shiny like patent leather.
With Tilda I learnt a new trick to place the image outside of the frame. A lady did email me a while ago with destuctions but I couldnt twig how to do it. I finally saw a video on you tube and as I'm a visual learner I clicked straightaway how its done - The video is here.
I've used Nesties labels 4 and edged that with victorian velvet distress ink.
Flowers are all from hobbycraft and the leaf is a woodware punch (grass) I've given all of it a spray of glimmer mist (pearl) so its got a subtle sparkle.
On the inside I've repeated the Tilda and punched it out with a circle scallop punch, the reverse of that I've put the Princess circle stamp and paper pieced the crown with the silver holographic paper. I've made another circle to match the front and used some lace to make a border and added a picture of my little Princess, stamped some number 2's and the may all your dreams come true. On the other side of the flap I've put Molly in sticky letters and covered with silver holographic glitter.
The borders down the middle of the front and on the edge of the flaps is a martha stewart doily lace punch.
This card took almost 2 days to make, well inbetween the kids and whatnot but it was a looooong time but my princess is worth it :D
Entering this into...
Just Magnolia - Lace borders (On the circle on the inside)
Sir Stampalot - Punches (2nd entry)
Sketch Saturday - Sketch (Hope it counts as its the one I followed!)
Ooh la-la - Colour Inspiration
A Spoonful of Sugar - Celebrations
Pollycraft - Hidden Message
FRONT OF DESIGN
Sunday, 23 August 2009
ROP & Just Magnolia
The challenge this week at Roses on Paper is Autumn colours - red, Orange and brown yum! I'm teaming it with the Just Magnolia challenge which is a sketch by Rachel Jakes this week. If you pop over to Rachels blog you'll also find candy! Be quick though as it closes on 23rd!
Red flowers are part of a Victoria Case design and I added orange mulberry flowers on top.
Wednesday, 5 August 2009
Just Magnolia 16 - Distressing
The challenge this week at Just Magnolia is distressing, I mean to rough it up a bit its not distressing as in upsetting me you know... :D
Image is coloured with copics and then I ran the scissors round the edge then pushed on some distress ink in antique linen and then vintage photo, curled up a corner and secured with a brad (which I coloured with a copic pen coz I couldnt find a red gem brad anywhere!) Flowers are made with starburst stains and a woodware multi punch then added dots of liquid pearls and sprinkled on some crystal glitter.
Thursday, 9 July 2009
Just Magnolia week 12 - so charming
The challenge over at Just Magnolia this week is to use charms. Giving my new Tilda a run out again :) This is my calender pic for July so I'll be looking at it all month! Tilda and background are coloured with copics She is holding a charm in her left hand which also has a couple of swarovski beads on for extra sparkle. There is also a heart shaped flowery charm on the ribbon.
Tuesday, 30 June 2009
Just Magnolia challenge 11
This one is for this weeks Just Magnolia challenge which is a sketch by Bev.
The background is made with H2O's then I sketched over them (looks kinda familiar lol!) Tilda is coloured with copics and I added green bows as leaves with the flowers.
Wednesday, 24 June 2009
Just Magnolia challenge 10 - Summer
This one is for the Just Magnolia challenge - Summer. Really fond of this Tilda as she's really versatile. She's coloured with copics and I used the blender pen to get more shades :)
Thursday, 11 June 2009
Just Magnolia week 8 sketch by Rach
Subscribe to:
Posts (Atom)