Monday 30 November 2009

Crafty Cardmakers 9 DT - Alternative Xmas

Have a very alternative xmas! This challenge is designed to get you crafting out of the box, looking at your stash and using it a little bit differently. The challenge set is to make a card/layout/project using either....

1. A christmas image using non traditional colours so NO red, green, gold combos here. Think lilac, pink, blues instead

or

2. Use a NON christmas image such as shopping Anya or a summer tilda etc but use traditional xmas colours (red,green,gold)

I've taken option 2. I cannot begin to tell you how special this stamp is! It was custom made for me by Nikki at Dewdrop Craftz and is PERFECT! Exactly the look I wanted! Its styled on the simple expressions stamps that Katys Corner used to do and is a converted photo of my Great Grandmother, My Aunt Gerrie who died earlier this year, my Dad and my Grandmother aka Nan! Nikki has also made me a 2nd one showing just my Dad and Nan which is ATC sized.

Here is the original photo taken in the Isle of Man circa 1951
Here it is ready to print


And here is the stamp in use!


The background to the stamp is starburst stains Cathedral pines green, peony scarlet red and winter jasmine gold which has been sprayed on. I changed the dauber cap to a spray and dried inbetween colours. This is a nice method as it doesnt use up too much of the ink and dries super fast. The image was stamped and embossed with black sparkle powder so its a silver glitter and I made the panel at the bottom with green card which is cuttlebug embossed and I used metallic rub ons in the corners. The holly leaves are brads I turned up with pliers to act as the stopper and the poinsettia is from a simple expressions plate coloured with promarkers and made 3d.

**Cath is offering the plate with this stamp on as candy which closes today so hop over quick to try and win it!**

The background papers are printouts from the bearly mine designer extreme III disc.

Thanks for looking!

Sunday 29 November 2009

Debbies AWESOME blog candy whoop whoop!

For promarker luuuurvers like myself and thousands of others this is a dream candy from Debbie - Wiccababe. Letraset who make promarkers have finally taken note and have produced with the help of Debbie a starter kit containing 12 colours chosen by Debbie herself. She also has her own instruction leaflet included with a picture of her card adouring the front, oooooh! Well done Debbie!


To celebrate she is offering not one but 2 prizes on her blog, you'll have to be quick though!

Main Prize 12x Diane Duda Xmas stamps from Sugar Nellie - Making Friends and Waiting for Santa25 Promarkers: Burnt Sienna, Raw Sienna, Sandstone, Spice, Coral, Rose Pink, Ruby, Berry Red, Red, Shale, Pastel Yellow, Canary, Meadow Green, Apple Green, Lime Green, Grass, Forest Green, Pine, Cool Aqua, Cornflower, Royal Blue, Indigo Blue, Amethyst, Blush & Satin.4 Fineliners: 0.1, 0.3, 0.5 and 0.7Total worth £57.55


Main Prize 2**Update**Letraset Craft Gift Pack which contains: Blush, Pink Carnation, Fuchsia Pink, Denim Blue, China Blue, Grass, Lush Green, Caramel, Cocoa, Umber, Sunflower & Poppy promarkers, plus 1 fineliner pen, 1 blender pen, 1 storage wallet, 1 marker pad and MY instruction sheet.RRP £34.99 Runner Up 15 Greys - CG1, 3, 4 & 5, WG37 Promarkers: Pastel Yellow, Satin, Sandstone, Lime Green, Cornflower, Amethyst, Ruby Total worth £20.28


Runner Up 24 Greys - WG2 & 3, IG3, CG48 Promarkers: Pastel Yellow, Satin, Sandstone, Burnt Sienna, Black, Lime Green, Berry Red, Royal BlueTotal worth £20.28

Friday 27 November 2009

Cards for The Stampman create & craft show 28th Nov

LOL Don't know why this appeared on my other blog, I was signed into this one :$ Silly blogger playing tricks again!

As promised I'll start going through them and how they were made! I'm starting with the easy ones *smiles* and working my way up lol!

As I mentionned I've tried to do some at all skill levels so that anyone can relate to one of them.
This one is my favourite of the easier ones so a good place to start

The backing paper is starburst stains in Glory of the seas gold using the scrunch technique. You paint it onto a piece of plain copier paper, add a few extra blobs, fold it in half then crumple it up. Open it out and dry with a heat gun or in the oven (or washing line if the weather is good!)
The main panel is the same colour painted onto card then I have put quite a bit of the stains on to form puddles going right across the card and dried them with a heat gun which had left 2 tones of gold, the puddle looks blue, cool hey!

Next I have stamped and embossed the frame and also the small set of fairies and then stamped some stars in stazon timber brown in the background. Added some iridescent sticky gems around the bottom swirls and tied a black ribbon and pushed a gold brad through. The brad has been stamped with stars using stazon, its easier to bring the brad to the stamp to do this. Ive then added a sticky gem to the centre.
The angels wings were made using a glue pen, left to dry and then added some leafing foil which you should see on the show tomorrow, its lovely to work with :) I scratched into the foil with a pricking tool to give it some detail rather than a solid look.


*****************************************


This one I call Fairy Party :) The backing paper is made with Opal Sea Oats using the scrunch technique. Its a beautiful colour this, I love it! The panel was made with the same colour using a puddle technique but only lightly then I have used stazon timber brown to stamp the smallest fairies first randomly. I stamped off onto scrap paper first so that the ink wasn't as dark then I have gone over this with the medium faires and finally stamped the large fairy and the stars and embossed with moonglow midnight copper embossing powder.


The edges were distressed with scissors, you simply open your scissors and run these up the edges. Then I have used a piece of cut n dry foam dabbed into the stazon timber brown and run this round the edges, turning up one corner and securing it with a copper brad. I distressed the mounting card with stazon also.


The panel at the bottom is made with a layer of acetate then a sheet of double sided sticky, added the gold leafing foil and more double sided sticky to secure it at the back and then I've stamped with stazon at the front.

**********************************


The background to this is made using Moonshadow Mist in Tawny Turquoise (now the blue mount makes sense eh!) which has been sprayed onto card. I stamped the medium fairies with stazon timber brown, again stamping off onto scrap paper first to make it lighter the I have stamped and embossed the large fairy and added a silver brad on her wand.
I have stamped using stazon all around the panel and in the corners of the base card adding blue ink over the top.

The fairies dress was made by stamping part of the fairy onto acetate and adding foil using a double sided sticky sheet as previously mentionned and cutting out before using more DST to attach it to the fairy.

Thursday 26 November 2009

The Traveller

This is a new digiz release from Dewdrop Craftz and I think he's awesome! I love the mystery surrounding him, where has he come from, where is he going? Couldn't wait to colour him in! I loved doing his hair and clothes, the lines are perfectly drawn to flow nicely and I hope I've done a good job!

I'm entering this into the following challenges;


Passion for Promarkers - Vintage


My time to craft - Very Vintage


Creative Card Crew - Favourite Things

Quixotic Paperie - Ripped paper


Dare U digi - Glitter

Lots to Do - Free Theme


I used DCWV Old Worlde as my base layer and distressed with brilliance coffee bean ink, curling one of the corners and distressing the edges. The mount is a torn piece of starburst stains in Saxifrage Olive Copper which is a gorgeous green with copper shine so looks very aged.
The image is The Traveller digiz by Dewdrop Craftz
which a brand spanky new release this week. He's coloured with Promarkers in...

Face: Ivory, Blush, Vanilla
Eyes: Leaf Green, Emerald, Cool grey 4
Clothes: Lime Zest, Pear Green, Moss, Marsh Green
Hair: Vanilla, Sandstone, Cinnamon, Cocoa

The clasp thingy for his scarf I embossed the centre jewel using a versamark pen then used moonglow fiddlehead fern green embossing powder, did this 3 times to give it some depth and added a sticky gem. The 'metal' I used a glue pen and some fab gold leafing foil. The snow on his shoulder I used aleens glitter snow, mainly because I couldnt find my puffy stuff. It said let dry for 24 hours, oh no we don't! I heat dried it from underneath and the top, it actually fluffed up a bit like puffy stuff who's name totally escapes me at the moment! Before it dried I sprinkled on some glamour dust to give it more sparkle then I edged the card with the brilliance ink and also lightly onto the snow to take the white glare down as the card is vintage themed afterall :D

I added some ribbon and some beads, the large green bead is something off one of DD1's Primark belts or something and the bottom beads are emerald green crackle beads and swarovski crystal AB beads which are my absolute favourite thing at the mo!

Also a quick reminder that Dewdrop Craftz challenge 2 is still open if you wish to enter, the theme is "Summer of Love" and not christmas lol! Click here to have a peek.

Thanks for looking!


Wednesday 25 November 2009

The stampman (lady) on C&C Saturday 28th @12

Just a reminder that Jill will once again be demoing the fabulous Tracey Coates range of stamps along with some rather fabulous moonglow starter kits, amongst other items on this Saturdays Create & Craft (freeview ch36) at 12pm.

I've been busy all week creating some cards to show and nervously waiting to see if they were up to scratch and can thankfully say Jill likes them so I can breathe a sigh of relief! I wanted to aim for all corners really, from the newer cardmakers and stampers up to those more experienced so I used a variety of techniques at different skill levels. Some are PAS (Plain & Simple) and others far more complex.
You will be able to create similar ones with items from the show and very basic supplies, I didn't use anything fancy like a cuttlebug (starburst stains & Moonshadow inks look fab cuttlebug embossed!) I stuck pretty much to items on the show, well except iridescent sticky gems which I use by the gazzillion :D
I can give you a sneak peek of my offerings, I'll go through them individually over the next week or so as some are quite complex and require a bit of explaining lol!
Cards from the Starburst Fairies stamp plate


Cards from the Butterfly Beauties stamp plate


Tuesday 24 November 2009

Wanna win some scrummy candy?


Here's a pic of what you could win! Click here to go to the candy post to find out how! Closes 11th Dec 2009

Dewdrop Craftz have a new digi release

And aren't they fabulous! If you're looking for something a bit different or fancy a change pop on over to check them out!

DEWDROP CRAFTZ NEW DIGIZ

Nikki has kindly given me The Traveller to play with, I think he looks really mysterious so watch this space for him coming to life sometime soon!

Check out Christmas Macot too, she's a real cutie pie, Jana has coloured her in so you can see her in her glory!

Monday 16 November 2009

Crafty Cardmakers 9 - As clear as day

Oh yes we have another challenge for you over at Crafty Cardmakers. This time it is to use something clear, transparent, translucent or see through. It doesn't have to stay see through but it should start life as such i.e. acetate you coloured with inks. There is the easy road of course where you can opt for something simple like clear sticky gems but who wants simple? OK I know some folk do but Crafty Cardmakers is a learning resource (hopefully ha!) so its as much about challenging yourself!


The girls have done some fabulous and inspired works over there so pop over and give them some loves :D

Here's my creation for it and dah dah daaaaaah I finally did an easel card. Its one of those "Is that IT?!" moments when you make the base as its soooooo simple! Amanda who's my DT teamie over at Dewdrop Craftz has made an easy picture tutorial here but the rule of thumb is fold whatever size card you make in half and then fold the back of the card in half so it touches the centre to make your mountain fold. If you made a 5"x5" card then you need a piece of card 5"x5" extra to make your design on and simply glue this onto the fold.

Papers are printouts from Bearly Mine designer extreme volume III then I have stamped Tracey Coates' butterfly from the butterfly beauties plate in the middle of a piece of acetate and stamped the edge of the smaller butterfly in the corners. I flipped it over and used glue to add some glamour dust to the back of the butterflies and corners and waited a long time for it to dry lol! Once dry I attached this panel over the card (which has the DP's on) using brads and hung a butterfly charm from the corner. The pink gems are nailheads I got from the stampman, they come on a sheet and you simply cut off how many you want so no messing round lining thisngs up. They're actually more like flat pinheads but are a lovely metallic colour.

The butterfly at the bottom was made by swiping a brilliance tri colour inkpad (Twilight) across some card and stamping the butterfly twice and mounting it 3d. I was thinking of doing these as acetate or shrink plastic but had a few issues and coz I've been ick ick I just went with the brilliance ones so I could go back to bed :D


Many thanks for looking!

Wednesday 11 November 2009

Im thrilled, honoured and totally over the Moon(glow)

CANDY IS NOW CLOSED! I'M CHECKING ENTRIES AND WILL ANNOUNCE THE WINNER ON SUNDAY!


To announce I've been asked to join The Stampman design team! If you read my blog or know me you'll be quite aware I'm kinda very very fond of Moonglow products and my craftroom looks a bit like Stampman central lol! Moonglow have a number of products such as the fabulous Starburst Stains, Moonshadow inks and mists, glitz spritz, pigment powders & embossing powders that are either two tone or have such a beautiful sparkle I'm like a magpie to them hehe! The Stampman are the UK stockist of these gorgeous products! They also sell some rather superb stamps by the extremely talented Tracey Coates and Kay Carley, go check them out here!

Jill regularly updates their blog with news of create & craft appearances, example cards from the Design Team and any new stock they have so please do go and check them out!


In celebration of being asked to join such a superb team I am offering some candy! I've put together a pack of my favourites as a Moonglow sampler which includes:


Glitz Spritz - Medieval Gold

Starburst Stains - French Lilac Violet

Starburst Stains - Maidenhair Fern Green

Moonglow embossing powders - Razzleberry Plum

Moonglow embossing powders - Midnight Emerald

Moonshadow Ink - Tawny Turquoise

Moonshadow Mist - Phantom Fuchsia


To be in with a chance of winning this you need to become a follower of The Stampman blog (mine as well if you like!) and post the blog candy pic at the top either in a post on your blog or in the sidebar and leave a comment on here so I can check!

The candy will finish at 12 noon GMT on Friday 11th December and the winner announced shortly aferwards. Good Luck!

Tuesday 10 November 2009

Debut DT at Dewdrop Craftz

Dewdrop Craftz have a new design team and a new challenge for you and whats more Nikki has moved it back over to blogger, given it some new wallpaper so its a whole new look! I do hope you can join in with the challenge which is SUMMER OF LOVE. If you're a little fed up of xmas cards (or like me don't make any lol) then come and unwind and do something a little different!
OK here's what I've done! The image is Loli Koukosi which is a digiz. You get the girl and boy separately so you can use them on their own or together like I've done. I'll try and explain how I did it, if you're familiar with layers in an image editting program then you might be with me, if not I'll try my best lol! I used Paint Shop Pro for this.
I opened a new blank image and copied first the boy and pasted this as a new layer then the girl also as a new layer so they are on 2 separate layers. I turned the girl around (Image-Mirror) then pulled her over to the boy. I selected the eraser tool and in the screen menu clicked on the layer containing the BOY. Using the eraser I rubbed out bits of him that overlapped with the girl. It wont damage the girl on the top layer but will just take off bits of the underlying layer if that makes sense!
I've coloured the image with promarkers and sponged on Heritage shimmer ink then stamped the gorgeous flower swirl which I'm rather traken with at the moment which is from the infamous Tracey Coates butterfly beauties plate. Papers are K&Co (Sparkly sweet) and HOTP (Cardmakers pack) Added a ribbon and tied about 3 bows so it bunches like that and added some flowers which Judy sent me!
Many thanks for looking and I do hope you spread the word and come on over and join in!


Sunday 8 November 2009

A modern vintage

Time for some vintagy type stuff me finks! I love walnut and sepia inks but ones that change colour oooooh! Oh yes that would be Moonshadow inks! Not seen them well come have a looksie :D

Moonshadow inks are walnut inks with added mica shimmer so depending on what way you look at them they may appear brown or another colour like fuchsia, cool huh!

I'm entering this into the following challenges:

Lots to Do - Distressed

Created by Hand challenge - Times gone by

Whimsical Ink - Butterflies

My Time to Craft - So many Scallops


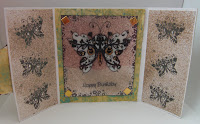
Well this is a gatefold card (Yes I know I like them and I promise I will try an easel card this week!) The front panels are cuttlebugged moonshadow phantom fuschia which from this angle look brown. They are mounted on starburst stains helitrope purple plum. I made the lollipop flower with the same colours distressing the edges with scissors and swiping some white acrylic. The centre button is the small butterfly from Tracey Coates' Butterfly beauties set which is made with shrink plastic inked brown then stamped in silver.

Opening the card and you will find the same panels to the sides and the image is the large butterfly from Tracey's set which was stamped and embossed with moonglow silver moon sapphire EP onto a panel I made using moonshadow inks in Phantom Fuschia and Tawny Turquoise (which I'm totally in love with!)

I used a puddle method to get all the swirls in the colour. Basically you use a decent weight cardstock (300gsm) and paint the surface with one colour then drop big puddles of another and blast with a heatgun. This pushes the colours around in swirls so you can move your heatgun further away if you want a puddle in that place or move it closer to spread it out more. Add drops of the 2 colours as you go along until you're happy then stamp on it :)

You can now see the colours properly here, brown is now turquoise and fuschia, fabulous! I love colour change things I does hehe!


Thanks for looking x

Friday 6 November 2009

Flutterby Wednesday

I likes this blog I do! Flutterby Wednesday are asking simply for you to create a card with a Fairy or butterfly on (or an angel!) so I can't give that one a miss as angels, fairies and flutterbys are quite up my street :)
Photo isnt so good as the colours are really subtle but the image is part of the Tracey Coates plate (Yes its a new toy and I likes it a lot hehe!) I stamped in brilliance Peacock which is a blue and green pad and embossed with crystal embossing powder so its a bit sparkly. The mount card I used the brilliance pad and swiped across so it would match the front. I cut the image into 4 and mounted onto black card. The charm at the bottom is made with black shrink plastic.
Thanks for lookin


There be a sorceress in the house

Oooh I luuuurve this digiz by Dewdrop Craftz She is just a dream to colour in :D As you might notice I like things that are a little bit different and she fits the bill.

I'm entering her for Passion for Promarkers whose colour choice is Canary & Grass and also Papertake who had a sketch.

Image was coloured with promarkers using Meadow green, grass and a touch of emerald and also primrose and canary with a few browns etc for the hair. I edged in adirondack ink (Juniper) and stamped the flower swirl (which is part of the Tracey Coates Butterfly Beauties plate) using versamagic ink.

Background papers are god only knows what and some starburst stains in green and yellow, the yellow has been cuttlebugged :) I also stamped the word Spirit at the bottom.

Thanks for lookin!

Monday 2 November 2009

Crafty Cardmakers #7 DT - Stamp Something

The challenge over at Crafty Cardmakers is to Stamp Something. There is an optional extra challenge to try something new or different or a technique you haven't tried in a while such as adding swirls to the corners of your image, masking or heat embossing.
I've done a mini tutorial along the way on how I made my entry so here goes!

The image is part of a plate called Butterfly Beauties by Tracey Coates available at The Stampman.


STEP 1


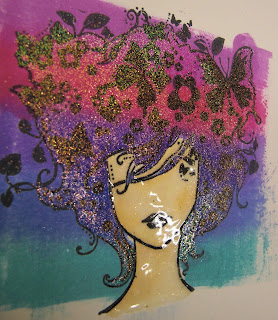
I stamped using memento ink then coloured with promarkers (Ivory, blush, vanilla and oatmeal) for this technique I recommend colouring in the skin a shade or two darker than normal. Then I used a versamark pen, yes fabulous versamark in a pen! Colour over your skin and add clear embossing powder and heat. You might want to repeat this twice to ensure there are no tiny gaps that ink can seep through (As I found out!)


STEP 2


Ink up a brayer, I used a kaleidacolour inkpad but you can use any multicoloured inkpads and roll this across the hair section. The embossing acts as a resist and when you've achieved a good coverage of ink simply wipe the face with some kitchen towl.


STEP 3


Next I used the versamark pen again and coloured in the hair section and used a kaleidoscope embossing powder (aka holographic) which changes colour from blues through to reds the more its heated.

STEP 4


Cut out your image without worrying about the smaller bits protruding from the hairline like the leaves.


STEP 5

Finally I made a background using starburst stains (ramblin rose pink) and solar gold radiant rain using a puddle method. I stamped the image out again onto this and embossed with the kaliedoscope embossing powder and stamped the flower swirl which is also part of the Tracey Coates plate underneath and embossed with moonglow venus violet blue before adding my image over the top. I then stamped and embossed the corners of a white base card and attached the panel. To add more interest (and bling!) I added dots of stickles glitter glue to the flower centres and added some sticky gems to the hair.

Thanks for looking!