Showing posts with label moonshadow. Show all posts

Wednesday, 9 November 2011

Treat box/Tealight candle card tutorial

Evening!  I have a little tutorial for you today for a really easy make especially if you're looking to make a lot in a short time.  With Christmas fast approaching these are a lovely little gift you can make plenty of in a short time.  There are further ideas at the bottom to customise it for your taste but as I'm making a lot of these for charity I simplified it :)


You will need:

1 piece of card 9" by 4"  (approx 228mm by 101mm)
1 piece of card 5 1/2" by 5 1/2" (Approx 140mm by 140mm)
1 piece decorated card just under 3" by 3" (approx 73mm by 73mm)
4 glue dots
Glue Stick
Papers to decorate


STEP 1 - Take your piece of 9"x4" card and score it at 4" and 5"  on the inside then score your 5 1/2" x 5 1/2 card and score it on the back around each edge at 1/2" and 1 1/4"


STEP 2 - After you've scored your square card you will see little squares formed, trim these as shown (NB see pic for red cut line)


STEP 3 - Fold in your box as shown below and secure the flaps with a glue dot - I have tried numerous glues and they dont work very well so a simple glue dot will hold it nicely.
Trim the opening of the box by snipping the corners.


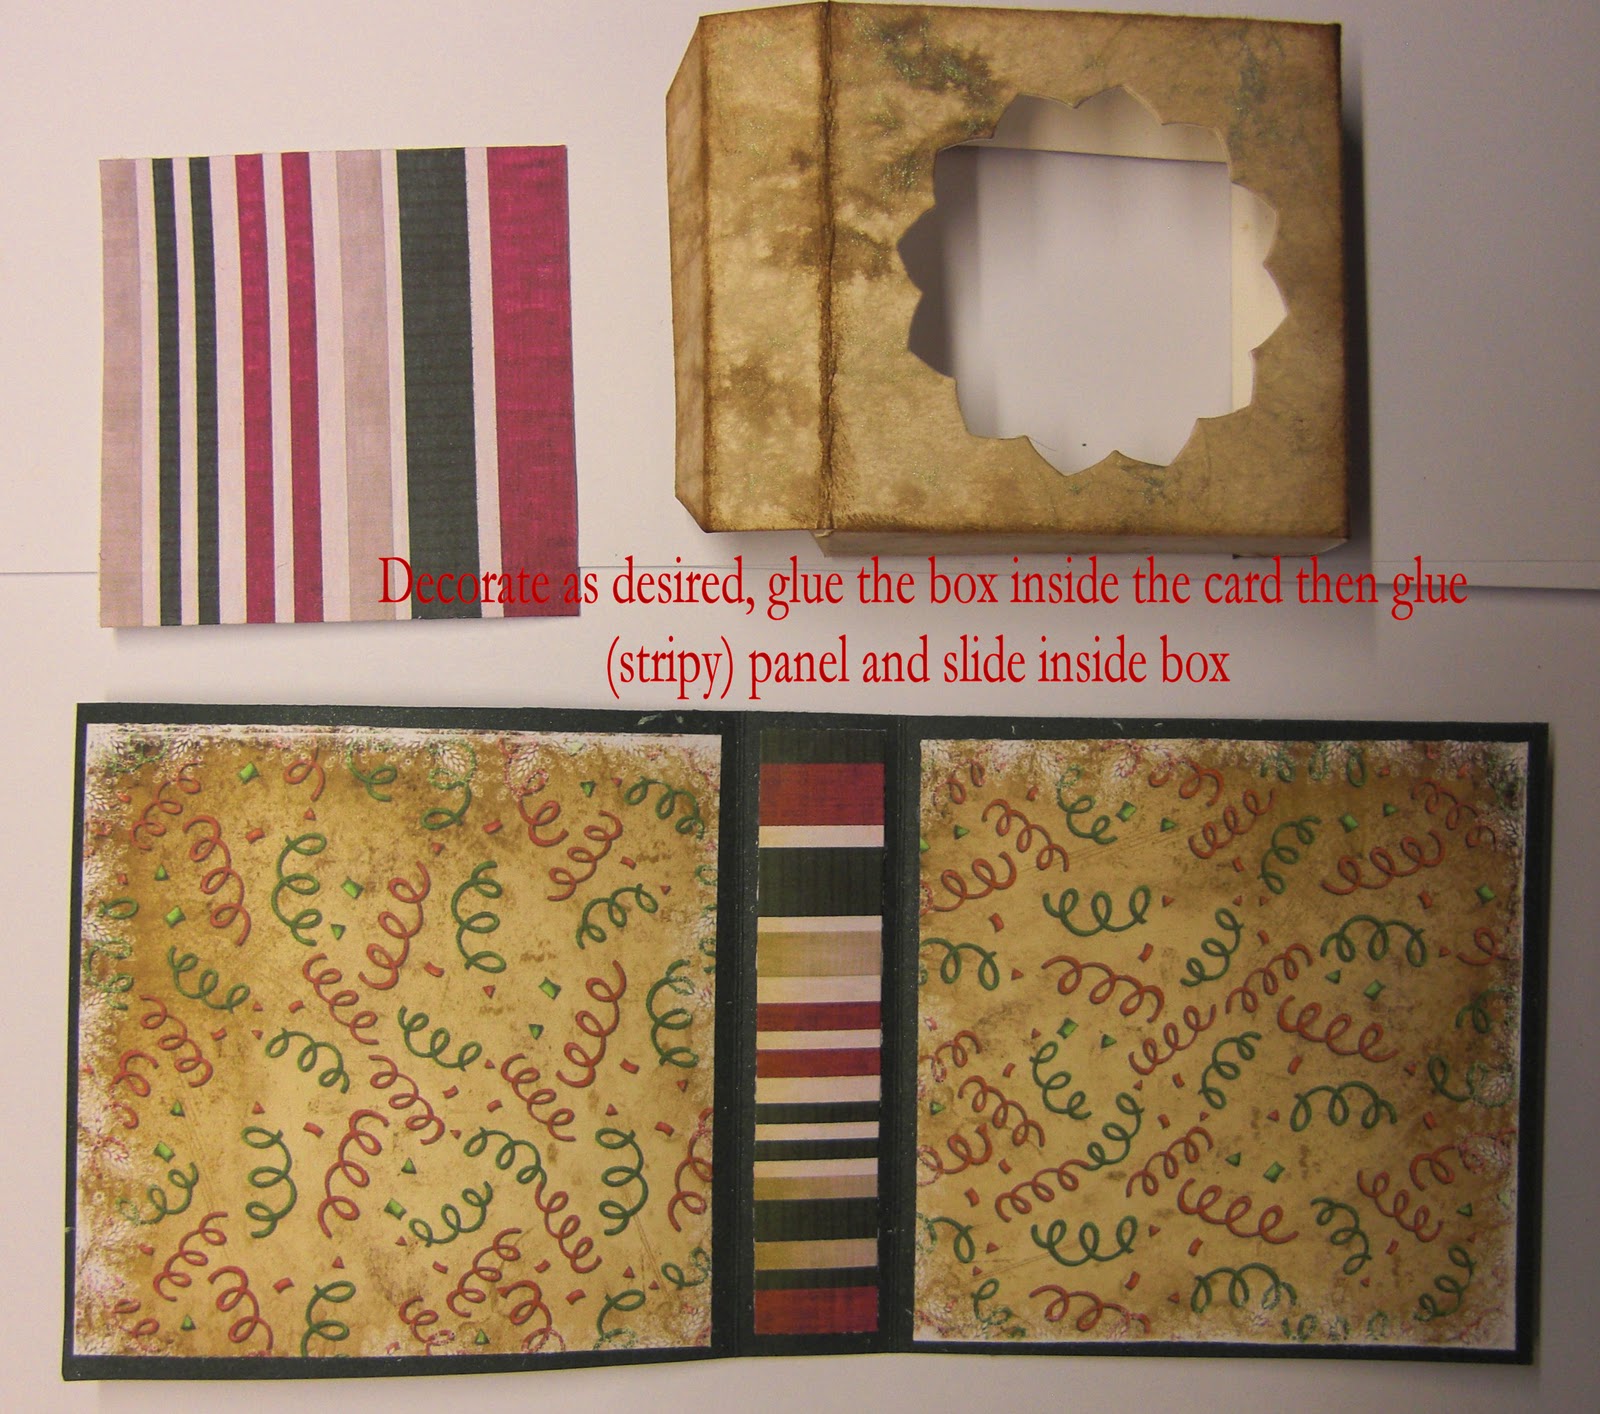
STEP 4 - Decorate as desired then on the bottom of the box use a glue stick along the flaps and glue this onto your card base.  Take the small piece of decorated card (Slightly smaller than 3"x3") and glue the back, slide this into the bottom of the box and secure.


STEP 5 - Fill your box with goodies!  I have used scented ikea candles which fit nicely.


And this is the front using part of the new ANGEL RAYS digi.  Papers are from Bearly Mine and I used Moonshadow Ethereal Emerald for the box.


FURTHER IDEAS!

You can make your card base larger if you wish, simply readjust the measurements.  I make them 4 x 4" as you can get 2 card bases out of 1 sheet of A4 at that size

Add a layer of acetate on the inside of the box if you wish to fill with items that might fall out

Don't cut a hole in the top and decorate the top of the box so that it has a nice surprise inside

I also use ready decorated card, here I've used one I made with moonshadow ink as the boxes are quite fiddly to decorate with patterned paper and if you use patterned paper on the top before die cutting make sure your glue is completely dry or it may tear or slip!
You can use plain card for the box and simply spray with GLIMMER MIST for some sparkles.

I use 3" x 3" images on the fronts, this is very easy to do with digi stamps and you dont have to use the entire stamp (also saves time if you've lots to do!)

If you have lots to make do them together in stages so cut all your bases then score them all as it saves looking back repeatedly for measurements if youve the memory of a goldfish like I have!

Hope you like this and if you have lots to make for an event for example then I highly recommend them.  I think the Elizabeth Shaw mints fit as well (8)


**************************

I'd like to enter into...


Thursday, 18 November 2010

A Catch Up

Good Evening all!  So much for my early night!  I was literally dropping by 7pm tonight but then got distracted by altered photo frames and the like - you know how it is!  I'm actually very very busy craft wise at the mo but I cant show any of it haha!  Not yet anyhow....  So I shall have a rummage through my archives as I spotted a few I haven't blogged yet so its a bit of a show and tell session tonight :D

First up a baby card I made a few days ago for an order using one of Meljen's gorgeous digi stamps called "Cuddle Cloud Baby" its definately my most favourite baby stamp it soooo cute!  He's coloured with promarkers with some glittery bits using a sakura stardust pen.


Next up a little swarovski charm I've made for somebody, I luuuuurve swarovski beads, could work with them all day but way too expensive lol!  I've used Clear AB, Turquoise, Light Sapphire AB and White Opal bicones with Clear AB disco balls plus silver stardust and silver heart beads.

 My little Princess Miss Mookins in her Halloween garb, bless her!

 Both of my monsters having a tender moment on a bridge in Chester, they're rarely like that lol!  Ahhhhhh!

 Next up a couple of art decos I made ages ago!  I'd coloured the blue one in and turned my back for literally 20 seconds to set up my cuttlebug to cut it and Miss Mookins attacked it with a pen aaaargh!  It couldn't be rescued so this is version 2!  I did Fire & Ice for these :)


Another set of Art Decos using images I won at Pollycraft a while ago called Sharing Sherbet and they are Heartstings and Lovenotes. 
 And lastly another easel clock which is a man card eeeek!  This was made with a Dustin Pike digi (the fence) Another set of digis who's name I cant remember (the plantpot and tools) and a WOJ tree.  The archway has flowersoft and some vine die cuts on and the card base is moonshadow ink.
Well I think I've about caught up now so I'm off to beddy byes!

Sunday, 24 October 2010

Eeeek! Cards for Men at The Stampman!

Jill does lke to scare us a bit over at The Stampman challenges and this fortnight is MENS CARDS aaarrgh!  I thought should I pull a sickie, I've been run over by a bus or something but gave myself a good kick and set to work!

Recently I've been playing with triple embossing having been asked to demo it at Port Sunny which is actually Jills demo but she was engaged elsewhere so whats a girl to do but oblige!  A customer wanted to see how it was done so I showed her and they are fun to do especially with yummy Moonglow embossing powders!  Jill's also got these fab chipboard tiles in the shop which are perfect for triple embossing so I started with one of the tiles, added a green pigment ink for the base and triple embossed with Moonglow Adobe Fire embossing powder.  I've inked up the dragonfly stamp which is from Aspects of Design 03 Botanical plate with gold brilliance ink and pressed into the tile.  The background paper is from.... I have nooooooo idea lol!  I got it in a swap I think!  The panel is a fab stamp called Stone relief border which just looks great on any colour background, been playing with that one lots this week (and its HALF PRICE!)  I stamped it onto Moonshadow Ethereal Emerald which is one of my favs!
The rusty looking nail heads were black, I didn't have any gold so I splodged them with a gold acrylic dabber and also used that on the edge of the tile.

See Men's Cards aren't so bad eh!  I did keep it simples and for any occasion as the tile and moonshadow background provide enough visual appeal (in real life!)

Hope ya come an join in over at The Stampman challenges x


Tuesday, 3 August 2010

Time for another Stampman ATC swap!

Its Time for another monthly ATC swap over at The Stampman and this month's theme is - Time! The Stampman ATC swaps are actual physical swaps so you send in your lovely ATC's and get some back - fab!
There was a good response to the first challenge and Janet is in the process of sorting them all and posting them back to players (She got the bestest job eh!)
Hope you can come over to play :D

This is mine and I used moonshadow ink for the background (yum!) and overstamped with a clock background who I don't know who its by as I borrowed it from Jills demo box when I was up there last week lol! I used moonglow embossing powders (double yum!) and the small butterfly from Aspects of Design butterfly beauties set stamped on starburst stains with some teal nailheads at the bottom.

Thursday, 8 April 2010

My Arty Journal Page

I've been pondering over this art journal page for a couple of weeks now and originally I tried doing it in acrylics as that seems the done thing and I struggled. I realised what was bothering me was the materials, they weren't ME. I couldn't express something as personal as an art journal page using things that were impersonal to me so I ditched it and went with what I know and what works for me whether thats conventional or not because I'm not the most conventional of folk.

In this case I went with distress inks, a splash of moonshadow, a misting of radiant rain, a splodge or two of gesso and good old ink.

What did I want to write about is my next challenge and following the thought of changing materials as they were more me I went with how others may view me and how I view myself so I've stamped the eyes from Tracey Coates' Alluring ladies sheet which is of course from The Stampman. I use this as a blog header as its distinctive and it took me an hour to colour and I'm very pleased with the result :)

I've used distress inks and moonshadow ink to colour the page and swiped some gesso here and there and added a band of an old book gessoed and distressed across the centre. After I stamped and embossed the eyes I left it for a bit of pondering and the words from the same stamp sheet were jumping out at me and I thought well I don't have ANY of them! Anyone who actually knows me personally (and only the very brave few stick me out!) will agree I'm not in the slightest bit elegant, graceful, glamourous, don't have flair and most certainly don't have any sense of style.
My favourite shoes are black CAT boots which are a bit like steel toe caps without the steel. OK I've added bright pink laces to mine.
I've reflected this by using Helitrope purple plum starburst stains (From the Japanese gardens set) which is like a hot pink with a purply tint. The embossing is midnight teal, another firm favourite. I've also added the flying heart from the Artistic Elements sheet because I think its just fabulous and reflects my love of art & craft and the sentiment is also from there.
So here's a little page about me and my unconventional self complete with sparkly bits :)


Tuesday, 26 January 2010

Crafty Cardmakers #13 - Hearts & Romance

Its challenge time again over at Crafty Cardmakers and the theme is "Hearts & Romance" for this I made a heart shaped easel card. I thought on about halfway through I could write a tutorial on it as they're so easy to make so long as you know how a basic easel card works then its a piece of cake. The tutorial for it can be found here

The papers I've used are DCWV and HOTP. The stamp is by My sentiments exactly and I've had it a looooong time! Its a square collage type stamp which I've just used a bit of it and cut into a heart shape. Its embossed onto a background of distress inks (antique linen, vintage photo and red brick) which I've then rubbed over with violet essential oil just to see what it did really! It made the colours a lot more vibrant as shown in pic 3 below. When the oil has dried I've coloured in the cupid image with promarkers and added shimmerz pixie dust to paint the wings.

I'm entering this into..

Quixotic Challenges - Ink up and old stamp
Crafty Catz - Love
Crafty Ann - Embossing
Pile it On - Warm Colors
Caardvarks - Colour Red


This is the heart shape lying on the original sheet it was cut out from. I rubbed essential oil over the image (BEFORE using the promarkers) and it made the colours a lot more vibrant and it smells nice too!

The back of the card I have written in Moonshadow ink using a fountain pen. So long as your fountain pen has a convertor you can suck ink up with then you can use your inks in it to match the card, cool huh!


Sunday, 8 November 2009

A modern vintage

Time for some vintagy type stuff me finks! I love walnut and sepia inks but ones that change colour oooooh! Oh yes that would be Moonshadow inks! Not seen them well come have a looksie :D

Moonshadow inks are walnut inks with added mica shimmer so depending on what way you look at them they may appear brown or another colour like fuchsia, cool huh!

I'm entering this into the following challenges:

Lots to Do - Distressed

Created by Hand challenge - Times gone by

Whimsical Ink - Butterflies

My Time to Craft - So many Scallops


Well this is a gatefold card (Yes I know I like them and I promise I will try an easel card this week!) The front panels are cuttlebugged moonshadow phantom fuschia which from this angle look brown. They are mounted on starburst stains helitrope purple plum. I made the lollipop flower with the same colours distressing the edges with scissors and swiping some white acrylic. The centre button is the small butterfly from Tracey Coates' Butterfly beauties set which is made with shrink plastic inked brown then stamped in silver.

Opening the card and you will find the same panels to the sides and the image is the large butterfly from Tracey's set which was stamped and embossed with moonglow silver moon sapphire EP onto a panel I made using moonshadow inks in Phantom Fuschia and Tawny Turquoise (which I'm totally in love with!)

I used a puddle method to get all the swirls in the colour. Basically you use a decent weight cardstock (300gsm) and paint the surface with one colour then drop big puddles of another and blast with a heatgun. This pushes the colours around in swirls so you can move your heatgun further away if you want a puddle in that place or move it closer to spread it out more. Add drops of the 2 colours as you go along until you're happy then stamp on it :)

You can now see the colours properly here, brown is now turquoise and fuschia, fabulous! I love colour change things I does hehe!


Thanks for looking x