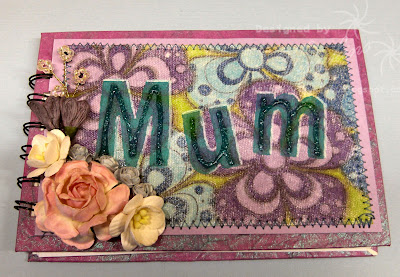
My old mucker Janey asked me the other day do I ever do non-gorgeous. Well YES I just don't show them here haha! So especially for Janey I'll also show the non-gorgeous #take 1 version below this lol!
I've used one of the cling stamps by Hero Arts - Big Flowers Pattern which I got from Stampman and stamped onto Claudine Hellmuth sticky back canvas here. I've coloured with promarkers which went a lot darker and my blender pen is running a bit dry so it turned out a lot brighter than envisaged! I toned this down using some Interference watercolours (white pearl/Interference blue & violet) then stamped Mum with acrylic paint dabber (Pool) and went around the highlights with an inkssentials gel pen. I've made it into a book which is backed with Starburst Stains in Bougainvillea Fuschia and added some flowers to the corner. As its material I used silcone glue. I even dragged my sewing machine out and put on some real stitching which I fluffed on the corner where the flowers are (**smiles**)
Hope you can come join us for our floral challenge at The Stampman with all these Mothers Day creations!
Would also like to enter into....
Southern girls - Use flowers
Simon says stamp - Anything goes
Sunday Stampers - Nature
Gingerloft - Flowers
Stampin sisters in Christ - Stamped flower
******************************
And especially for Janey how I get to the 'finished product' hehe!
Step 1 - Stamp onto pearly card because it looks nice, masking some flowers off for depth.
Step 2 - Colour flowers in with inktense pencils which you've never actually used before and should really be used on watercolour paper but hey pearl looks good.
Step 3 - Decide you don't really like this and colour over the inktense with some coloursoft pencils which actually work alright as they're quite happy with the pearly paper.
Step 4 - Decide you want to add more depth so start with a grey, maybe a darker grey, oh why not just go the whole hog and use black, it blends in right?
Step 5 - Cut out a piece with the cuttlebug then decide you're not much in the mood for orange afterall and abandon.
Step 6 - Decide as time is now pressing on to reach for the promarkers, I know how to use them right? Pick up a piece of canvas because Crafty Cardmakers have a fabric challenge running and hey why not!
Step 7 - Remember that canvas is not really that easy to colour on... Clock is ticking and I have to pick the kids up soon...
Step 8 - Finish colouring in the canvas, the promarkers are a lot darker than I imagined... Kinda 70's purple... Oh well this nice green can fill in the gaps - Doh! Thats lime green and we've just stepped back another decade into 60's flower power!
Step 9 - Pick kids up and entertain for rest of day whilst every so often pondering what you're going to actually do with this piece of gaudy psychadelic fabric...
Step 10 - Mooch emails on blackberry, somebody mentionned Jacks notebook - yes that will do! Its still psychadelic...
Step 11 - Drag out interference watercolours and paint a little bit of a corner, yeah looks ok and tones it down - slap white pearl, intereference blue and violet on (Above pic shows original and altered)
Step 12 - Drag sewing machine out and stitch edges. Completely fluff one edge so the thread snaps and machine makes funny grinding noise. Well I wasn't kicked out of needlework for nothing you know!
Step 13 - Construct a notebook using the bind it all. Trap finger in bind it all.
Step 14 - Attach flowers
Step 15 - Look for silicone glue to attach flowers
Step 16 - Look some more.... Find glue and attach flowers! Finish approx 28 hours after starting.


10 comments:
Oh how I love the finished product but nowhere near as much as the tutorial, ROFLMAO!!! BTW I had wallpaper very much like this in the 70s (cringe at memory!) xx
You're right...what a Rubbish card...NOT! HA!HA!HA! I do admire your perseverance though...I'd have thrown a full-blown tantrum, threatened to chuck it all in, put ALL my stash up for sale, shed a few (lots) tears, gone into therapy, chucked it in the bin...then gone to bed to sulk!!!
Thank you for showing such "restraint" xxxx
Wow Vix, This is fabulous and I had a good chuckle at your tutorial.
hugs
Marion
LOL at your tutorial!!! Great card - it was worth it. Jaqui x
Fabulous creation Vix, love the colours and the flowers. Do you know your tutorial could have been held in my house, that seems to be me too on so many occasions. Nothing seems to end up how I think it will. Never mind we get there.
Have a great weekend.
luv and hugs {brenda} xoxox
This is fabulous! Love all the stamping that you did and the fab texture and dimension!!! Thanks so much for joining us at Simon Says Stamp Challenge!
Hugs,t
Hello Vixykins - you have been one busy lady! I love all of your works with flowers - divine! You have a great sense of colour - what a great take on the sketch - love it1 Thanks for joining the Stampin Sisters in Christ challenge this week - we love to see you and appreciate your support! {{{hugs}}}
Linda SSIC Design Team
Wow, This is totally excellent & love your card- awesome Tute :) Thank you for joining us at Southern Girls
Hugz, Deb
WoW! What a creative card and love the colours! Cute tutorial too!
Thanks so much for joining us at Gingerloft Challenges :)
huggs
Lynn xx
PS: I am having a give away on my blog if you are interested
Love the flowers and the coloring:)
Post a Comment