AND! I won a Top 5 blinkie at Passion for Promarkers for my Mo Manning image wallet, woo hoo! I'm so chuffed! I've not been using promarkers very long but am slowly building up my collection!


AND! I won a Top 5 blinkie at Passion for Promarkers for my Mo Manning image wallet, woo hoo! I'm so chuffed! I've not been using promarkers very long but am slowly building up my collection!

 STEP 2
 STEP 3


 STEP 7
 STEP 9

 ADDITIONAL


Here's my entry ths week, I love love love this little lion!

The image is Victoria Case baby lion (cute isnt he!) and I coloured with copic markers. I added clear gloss to the water and touches of stickles glitter to make it sparkly and shiny. The green background is starburst stains bells of ireland green overstamped with a stampscapes frond stamp. The palm trees are made with bits of brown card shaded with a white pen and the palm leaves are starburst stains in cathedral pines green. The coconuts are cut from brown card then I glued cotton wool on and dyed them with starburst stains (one of the browns) then when dried I fluffed them up so they look like a shaggy coconut lol! Wording is from a dymo :)
Must tell you, I showed this one in playgroup and someone asked if it was colouring by numbers....Oh how I laughed :-/

The twinkling water :)

My shaggy coconuts and palm leaves :)
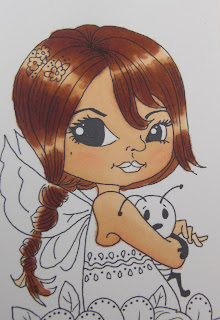
 Image is Sitting Fairy by Victoria Case (isnt she just lush!) I distressed the edges gently this time and edged with blue. I like the effect distressing gives as it looks like it was stamped on linen. She's coloured with copics of course (Thats that Sheilakins fault that is getting me into them!) Background dark bue is bazzil bling and I stamped some swirls in the corners with white stazon. Ribbon was white but I coloured it with distress inks, added a charm and a swarovski crystal. Sticky gems down the bottom are coloured with copics to match too.
Image is Tara by Victoria Case Stamps coloured with copics. I edged with distress ink in cool peri just to take the glare of white down. I printed Willy the worm out at 50% and popped him on too! Papers are K&Co and sentiment was a freebie on the do crafts creativity magazine with some papermania sticky gems in the corner.
Thanks for looking! Feel free to leave a comment I need the love today lol!
 Image is Kayla by Victoria Case stamps reduced in size to about 40% I think printed on bristol board and coloured with copics. Flowers also printed again and made 3d. Edged around the image in adirondack ummm cant remember but it was pink and a lights one and I used a corner adourner on glitter card to mount. Papers are K&Co

All papers ar K&Co and I distressed the edges with scissors then went round the edges pushing some ink in towards the centres with cut n dry foam. Image is Kayla by Victoria Case stamps coloured with copics. The flowers are 3d with a little distress ink (old paper) to take away the glare from the white card.
Thanks for lookin!
