Showing posts with label tutorial. Show all posts

Sunday, 18 April 2010

VIDEO TUTORIAL - HOW TO USE FANTASY FILM

Now this is new territory for me, a VIDEO tutorial so be gentle (and honest!) with me lol!
Having recently got some fantasy film I realised that I actually had this stuff a long time ago but didn't know what it was for or how to use it as it didn't come with instructions back then so if you have some and aree a bit unsure as to how to use it then here's a couple of quick video tutorials on making fairy wings and making 3d butterflies.


MAKING FAIRY WINGS WITH FANTASY FILM


MAKING 3D BUTTERFLIES WITH FANTASY FILM


Just a couple of further notes, if you use a domestic iron set the heat on low and work your way up. I set my encaustic iron to between the low and high settings and this works fine but a domestic iron will probably be hotter so experiment and start low.
Use ink that will dry on non porous surfaces such as stazon, I've used brilliance as I couldnt find my stazon (now found!)
You can use several strips of fantasy film, I do 2 strips as I like things delicate but you can make some fab embellishments using 4 or more sheets.
You can colour fantasy film with copics and promarkers, particularly if you have an airbrush system. You can also add stickles, bling almost anything :)

Friday, 23 October 2009

PROMARKER/COPICS SHOESTRING TUTORIAL - BLENDING

PLEASE ALSO SEE MY 2012 SERIES OF PROMARKER TUTORIALS HERE!

This tutorial is for blending using just 2 colours to achieve various tones and shades. The image I have chosen is Butterfly Swirl digiz courtesy of Dewdrop Craftz. She's only £1.99 if you want to download her.

I specifically chose this stamp for the tutorial because its 1. Scary 2. A challenge and 3. Gorgeous! I know a few people have mentionned they don't know where to start with this stamp and I think it will show off very effectively how to blend so that any other stamp you colour in will be a breeze. I resized to 4 inches tall for the example as this is a nice size to work with and will fit on your square cards.

You can colour any image using the same technique.


Firstly lets look at how the pens work. If you have ever watercoloured you will know that dropping paint onto a wet surface will cause it to spread out and blend. Painting onto a dry surface will leave a hard edge. Promarkers and copics work just the same, they have a wet and dry state. The example on the left shows the bleed from adding a line to an area still wet and on the right adding a line over a dry colour. The one on the left bleeds out more. Going over the dark colour again will make it bleed out into your light colour creating a tone.


Shall we start? Give yourself plenty of time to do this, kick back and relax and firstly colour in the skin tone as per the previous tutorial here (Vanilla and pastel pink)
Paperwise I use either Stampin up whisper white or tesco finest printer paper. Bristol board is also popular but soooo expensive!
OK off we go!
Choose a very light colour and a very dark colour of the same group. In the example I have chosen pale pink and mulberry promarkers (Joanna Sheen sells these)
You could use your pastel pink again and a darker pink but select what you have so long as its a light and dark. Decide where your light source is, I have chosen from the left. Start with your light shade and colour in parts of the image such as the dress and hair. I work in segments for this image. Now I must mention here that each time I colour in the image I might decide one line is hair and the next time its part of the wing, its part of the fun so dont worry too much, colour in what YOU think is the hair and dress leaving the wings for now. Leave the parts nearest your light source white for now.

(Your light source is where you imagine the sun is so areas furthest away will be shaded and those nearest will be lighter)
To create some tone touch the nibs of your light and dark together to pick up some colour and starting from the area that will be darkest colour in and push up into the lighter area leaving some original light and white showing as the 2nd pic below shows. You might want to do this a couple of times until you're happy with the tones achieved.

Whilst your ink is still WET run a line of your darkest across. Then using your light pen, colour straight over this pushing it upwards. This will give more tones but a bit darker. Repeat as required again leaving some original light and white behind. When you're happy let it dry off a little and add your dark to give you a shadow.


This is how we should be looking. Take it slowly, you'll get quicker with practice!

When you're happy with the results you have for the dress and hair move onto the wings. As I said previously it doesnt matter which bits you choose to colour in, leave some blank, do some darker or lighter its part of the fun with this stamp :)

To do the wings I have switched the colours so my dominant colour is now the darker tone. Colour and blend as before as the pic shows in progress.

And the finished result! Not bad for 2 colours :) If you're really lucky and have a copic spica glitter pen in clear you can bling this up with some sparkle :D

I hope this is of some use and you practice your blending. Once you master the technique you'll be able to colour anything!

Wednesday, 30 September 2009

TUTORIAL - BLACK HAIR (WITHOUT A BLACK!)

PLEASE ALSO SEE MY 2012 SERIES OF PROMARKER TUTORIALS HERE!

This tutorial is for creating BLACK hair without a black using only 2 pens! Remember all my promarker & copics tutorials are shoestring ones. There are plenty of other tutorials available for using more colours such as on passion for promarkers blog so my tutorials are designed for people with limited colours or thse thinking of trying them out and wanting to only get a few colours to start off with.
You will need the following...

PROMARKERS
Cool Grey 1 (or 2)
Cool Grey 5

COPICS
(Same)


STEP 1

Colour parts of your hair in the cool grey 1 leaving a band of white where the light will reflect (usually a bump on the hair)
STEP 2
Take your cool grey 1 and touch the nib onto the cool grey 5 as shown, it wont damage it! This will give you a cool grey 3 ish. If you're using copics scribble a bit off onto scrap paper first as the concentration will be too strong.
STEP 3

After picking up some of the colour from the cool grey 5 onto your cool grey 1 blend this over the cool grey 1 leaving a bit showing and not going into the white. Repeat this step as necessary to build up some tone.


STEP 4
Using the cool grey 5 colour onto the image leaving some of your blended tones and white showing. This works better if your ink is still a bit wet from the previous step.


STEP 5

Use your cool grey 1 and start to push the darker grey into your blended area and into the white, leave parts of this showing as required. You'll see how the cool grey 1 dilutes the 5 in the pic below creating more tone.

STEP 6
Using your cool grey 5 put on larger areas leaving some of your blended tones and white showing.


Step 7
Again with your cool grey 1 push the colour into the blended areas and repeat as required leaving a small band of white and several tones showing. To finish put a small amount of cool grey 5 on without blending.

This is one done on an Anya stamp using the same method.

Friday, 25 September 2009

PROMARKER/COPICS SHOESTRING TUTORIAL - BLONDE HAIR

PLEASE ALSO SEE MY 2012 SERIES OF PROMARKER TUTORIALS HERE!

This tutorial is for doing blonde hair using minimal colours using promarkers (or copics). For skin tones & brown hair see the previous tutorial here

PROMARKERS

Vanilla (or your usual skin tone)
A brown of your choice (I used terracotta)


COPICS
E00 (or your usual skin tone)
A brown of your choice

STEP 1

Colour your hair using vanilla and leave quite a wide band of white where you think the light will reflect. A bump on the hair is usually a good place!


STEP 2

Take the cap off the chisel end of the brown and pick up some of the colour with your vanilla pen (It wont harm it!) If you're using copics then scribble some of the colour you pick up onto scrap paper as the concentration of brown will be a bit harsh.
Just scribble the vanilla nib onto the brown nib to pick up some colour.


STEP 3

From the edges of the hair blend inwards towards the band of white you left so in this design I've worked underneath the headband and from all the hair edges inwards. Leave part of your original vanilla showing and don't go into the white just yet. Repeat this a couple of times to build up some tones and shade.
STEP 4

Making sure your vanilla nib is clean again (scribble off onto scrap paper) blend inwards from the edge again and start going into the white bit you left but leave some of it exposed.


STEP 5


It should look something like this now. You should have a small band of white where the light reflects and running light through to a darker blonde towards the ends. Job done!


**********************************************************************************

ADDING IN AN EXTRA COLOUR


STEP 1


Colour in your vanilla as before and instead of picking up the brown use pastel yellow instead so colour your pastel yellow over the vanilla leaving bits of vanilla and all of your white exposed.

STEP 2

Push your pastel yellow in with the vanilla and start pushing into the white area leaving some of it exposed. Repeat step 1 and 2 until you're happy with the tone.


STEP 3


Whilst the ink is still wet literally touch some of your brown in areas of shade (as below) This works much better if your ink is still wet from the blending of the previous steps.


STEP 4


Blend this in quickly with your vanilla pushing in towards your white areas and leaving some of them exposed.


FINISHED RESULTS

The image on the left is using just the vanilla and terracotta and the image on the right is using vanilla, terracotta and pastel yellow. Both are blonde hair but have different looks so it depends on what look you want to achieve. The left is more of a natural look and the right is much bolder.

I'm now adding in PASTEL YELLOW to make blonde.


Wednesday, 16 September 2009

PROMARKER/COPIC COLOURING TUTORIAL - HAIR & SKIN ON A BUDGET

PLEASE ALSO SEE MY 2012 SERIES OF PROMARKER TUTORIALS HERE!


OK OK I've been harassed to do a colouring tutorial lol! There are lots and lots already available so I thought I'd do a budget one. If you've got more than a few colours you might want to read my other tutorial HERE! I've been using copics since May 09 and have the grand total of 21 (3 have run out!) so I don't use a lot of colours, I just blend. Recently I bought some promarkers as they were cheap and then I added to them however you don't actually need many at all of either brand to get started. Not everyone has a huge disposable income especially us with small kids who outgrow things every other week or maybe you're thinking of trying them but don't want to fork out on lots of colours yet but I know a lot of people want to get all the effects you get with copics and promarkers but on a budget so here's how...

This tutorial is for brown hair. There is one for blonde hair here and one for black hair here. There is also a blending tutorial here showing how much tone you can get with 2 colours.
These tutorials are designed for people who do not have a lot of pens or are thinking of trying them but if you have a good colour range check out my other tutorial HERE.


For skin and hair (dark blonde to dark) you will only need...

PROMARKERS
1. Vanilla
2. Pastel pink
3. Choose a mid brown. For the example I used terracotta as its a nice reddy brown.

OR

COPICS
1. E00 (or E51)
2. E02
3. E29 or another shade of brown


The reason for the colour choice is that they are popular shades. The vanilla and pastel pink for example were recently on special offer in a pack so I know lots of people bought them (myself included!) If you don't have these colours just use what you normally would for skin and cheeks :)

The image I'm using is called Tara by Victoria Case stamps which is available in rubber or on digi by request (Isn't she absolutely beeeeautiful!).


STEP 1
Colour in your skin colour with the Vanilla (or E00/E51) leaving a couple of areas blank as these will be lighter. Remember the more you colour over the darker it gets (to a point!)


STEP 2
Use the pastel pink (or E02) to add some shade. Now this isn't everybody's cup of tea for adding shade but remember this tutorial is for doing it on a budget!
STEP 3
Oh dear she looks a bit of a mess.... Patience Grasshopper :D
Pick up your vanilla again (or E00/E51) and push the pink into the flesh tone. Now some people do this in a circular motion, some zig zag or other ways whatever suits you best. Personally I'm a circular kinda girl so I colour in tight little circles over the pink whilst pushing it in. Leave bits exposed as above (part of the vanilla and part of white) whilst pushing your colour in. When its blended nicely colour right over it all including the white bits.


STEP 4
Using your pastel pink again (or E02) give her some cheeks. The skin you just coloured in will still be wet so you dont need much as it will bleed naturally into it. Go over the whole face with the Vanilla (E00/E51) again to blend the cheeks in. Don't worry about going over onto the hair when you blend as this will be covered up later ;)


STEP 5
Looking OK so far! Next we're moving onto the hair. On Tara you'll see 2 distinct "bumps" on her hair. This is normally the area the light will hit. You can add other light areas too or not its your call! So we need to go back to the Vanilla and colour in most of the hair except leave some white bands uncoloured.

STEP 6
Now to keep the hair blondish just keep building up the vanilla and add just touches of the brown. With copics you can touch the nibs together so touch the brown onto the E00 and scribble quickly onto scrap paper (to reduce the concentration of the brown on the nib) then start adding it.
OK so the rest of this tut is for brown hair as below. Pick up your brown (terracotta) and colour over the vanilla but not right to the edge, leave some vanilla and white showing.


STEP 7
Using your vanilla again colour over your terracotta/brown (I use an up and down stroke to push the colours into each other) Push a little bit more into your white bits.


STEP 8

You'll see the terracotta/brown changing colour as the vanilla dilutes it as in the pic below. Keep pushing into the white gradually.
STEP 9


Simples so far! Now add more terracotta leaving the white, vanilla and the blended bit so your terracotta should be a bit narrower this time. You can stroke the odd strand into the lighter bits now too.


STEP 10

Repeat this as desired for the depth of colour you want. When you're done push the vanilla right over the white. You should now be looking something like this. . .


STEP 11

Now I add smaller areas of terracotta without blending over with the vanilla and voila job done! Colour the lips in with the pastel pink and use a gel pen etc for the flowers on the hair.

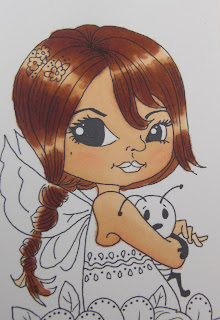
This (below) is the version done with copics. As I said previously if you don't have these colours just use what you normally would for skin tone and cheeks and add a brown of your choice!
ADDITIONAL
If after you've done the hair you've bled a bit onto the face just blend it in with the vanilla. If you have an even darker brown you can add a bit more depth by colouring over small areas of the terracotta.
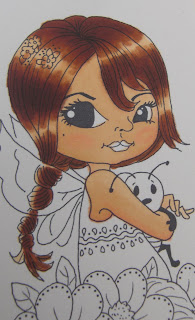
The finished piece (I used rose pink for the lips and 2 blues and 2 greens for the rest) You can use other mediums to colour in the rest of the image but these 3 colours will at least get you started :)