
You will need:
1 piece of card 9" by 4" (approx 228mm by 101mm)
1 piece of card 5 1/2" by 5 1/2" (Approx 140mm by 140mm)
1 piece decorated card just under 3" by 3" (approx 73mm by 73mm)
4 glue dots
Glue Stick
Papers to decorate
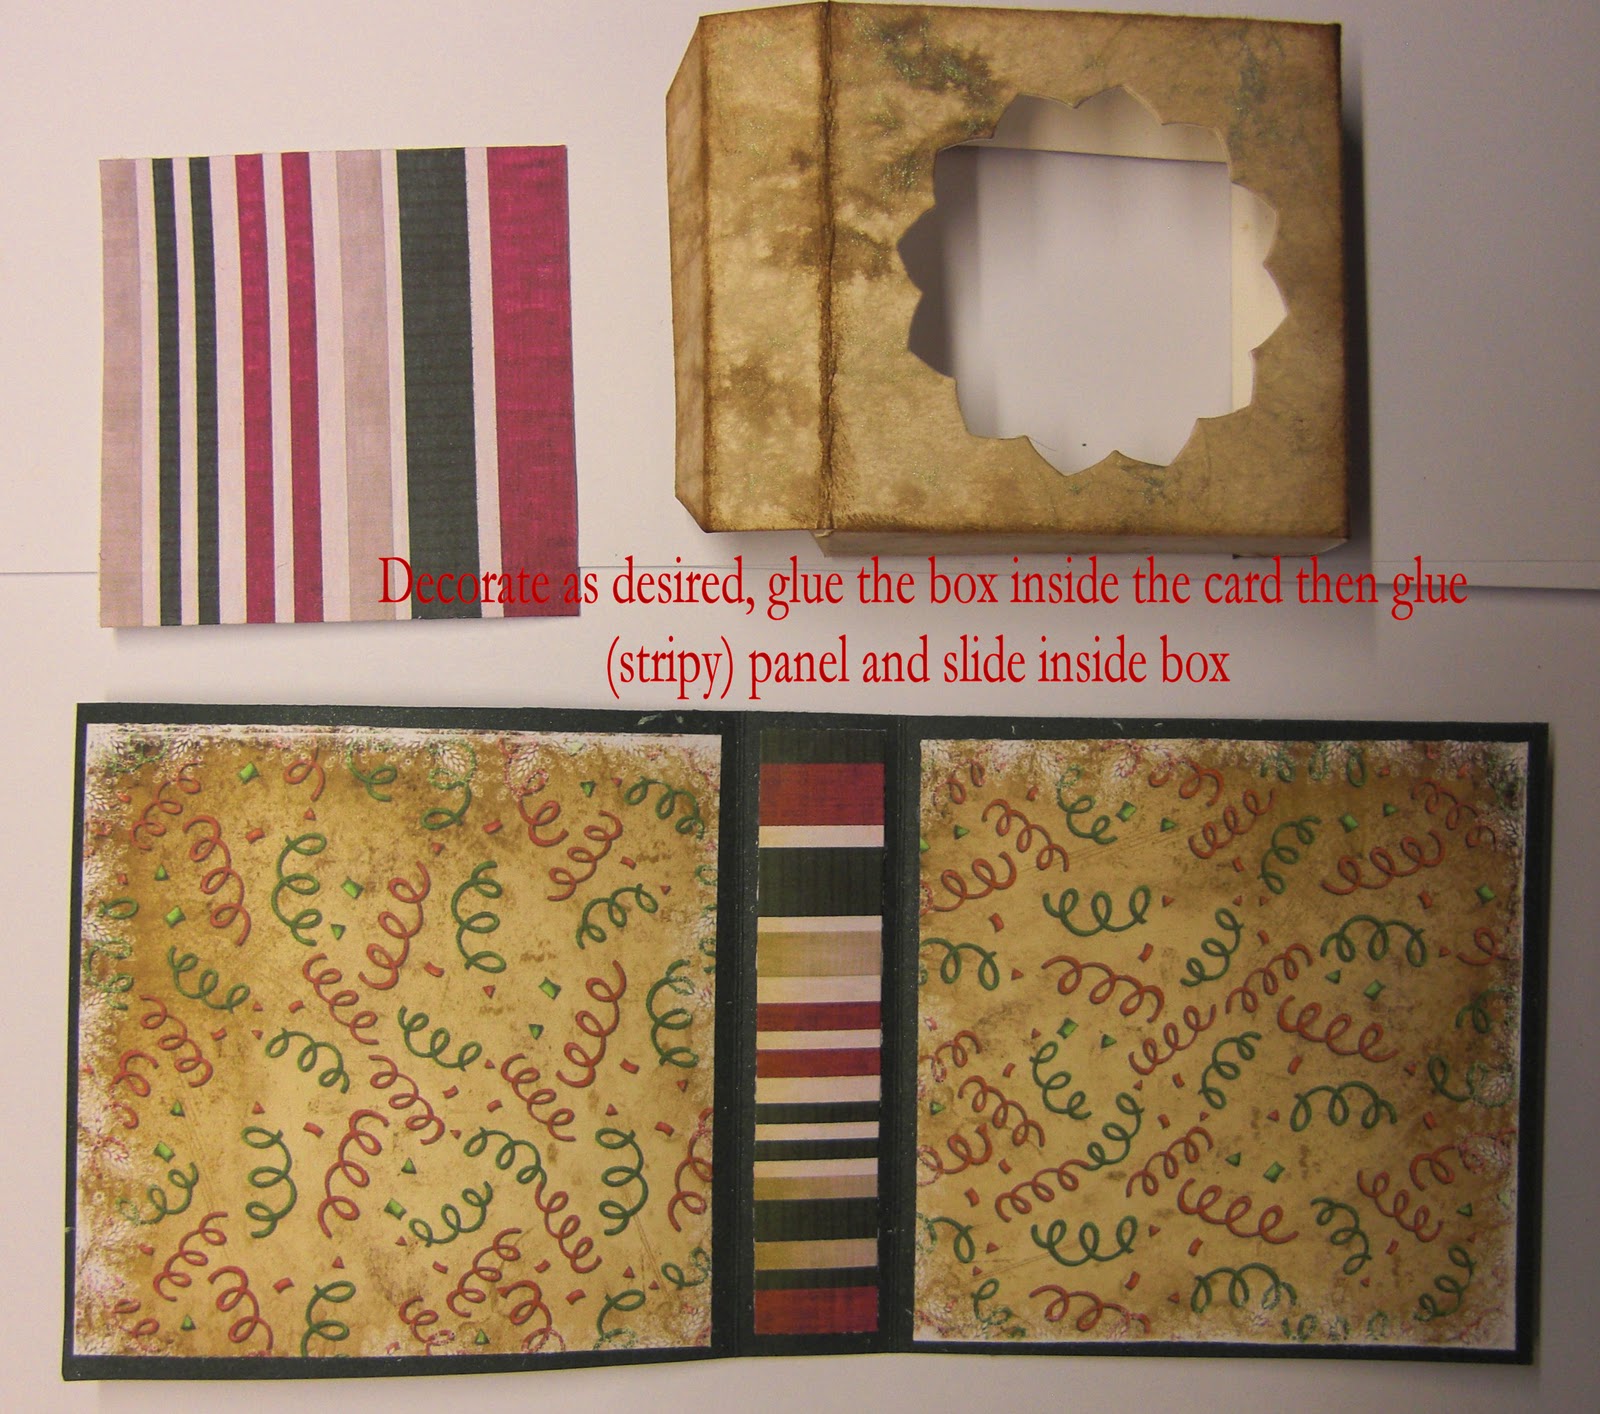
STEP 1 - Take your piece of 9"x4" card and score it at 4" and 5" on the inside then score your 5 1/2" x 5 1/2 card and score it on the back around each edge at 1/2" and 1 1/4"

STEP 2 - After you've scored your square card you will see little squares formed, trim these as shown (NB see pic for red cut line)

STEP 3 - Fold in your box as shown below and secure the flaps with a glue dot - I have tried numerous glues and they dont work very well so a simple glue dot will hold it nicely.
Trim the opening of the box by snipping the corners.

STEP 4 - Decorate as desired then on the bottom of the box use a glue stick along the flaps and glue this onto your card base. Take the small piece of decorated card (Slightly smaller than 3"x3") and glue the back, slide this into the bottom of the box and secure.
STEP 5 - Fill your box with goodies! I have used scented ikea candles which fit nicely.

And this is the front using part of the new ANGEL RAYS digi. Papers are from Bearly Mine and I used Moonshadow Ethereal Emerald for the box.


FURTHER IDEAS!
You can make your card base larger if you wish, simply readjust the measurements. I make them 4 x 4" as you can get 2 card bases out of 1 sheet of A4 at that size
Add a layer of acetate on the inside of the box if you wish to fill with items that might fall out
Don't cut a hole in the top and decorate the top of the box so that it has a nice surprise inside
I also use ready decorated card, here I've used one I made with moonshadow ink as the boxes are quite fiddly to decorate with patterned paper and if you use patterned paper on the top before die cutting make sure your glue is completely dry or it may tear or slip!
You can use plain card for the box and simply spray with GLIMMER MIST for some sparkles.
I use 3" x 3" images on the fronts, this is very easy to do with digi stamps and you dont have to use the entire stamp (also saves time if you've lots to do!)
If you have lots to make do them together in stages so cut all your bases then score them all as it saves looking back repeatedly for measurements if youve the memory of a goldfish like I have!
Hope you like this and if you have lots to make for an event for example then I highly recommend them. I think the Elizabeth Shaw mints fit as well (8)
**************************
I'd like to enter into...
22 comments:
That is really lovely and you make it look easy.
Thanks for the tutorial.
Hugs
Sue xx
That's a brilliant tutorial, Vix - love the way you've done it - so clear and easy to follow. Lovely work, too. I have a stamp for a box like this and it's always useful at Christmas and other times, but not quite as big as the one you made. Beautiful work x
Fantastic!!! I will borrow this idea for sure! Thanks!
Fabulous tutorial...even I can folloe that...fabulous work and love the beautiful angel image, and colouring...
Thanks for sharing with us at ‘Make it Monday’
Luv CHRISSYxx
Don’t forget. .if you leave a comment on another entrant, mention that you saw their card on ‘Make it Monday’ for a chance at second prize.. the more you comment on and mention MIM, the more chances at winning second prize.
Neat idea, I have made something similar but a bit larger and seemed to need a lot of paper!! Like having measurements as I always do calculations wrong myself. TFS Cindy
Oh wow!!!!
Thanks for playing at Digital Tuesday Challenge.
PS-I have blog candy!
This is gorgeous Vix, and a great, easy to follow tutorial. Thanks for joining us at Dream Valley.xx
This is fabulous and a great idea...really love it, thanks for sharing it with us at CraftyCatz this week.xx
Brill idea Vix, I may borrow it for the bits I'm making for Mum's Nursing Home Christmas Fair, x
WOW, I love this! Thanks for the tutorial!! Thank you for joining us this week at Craft Your Passion Challenges and Good Luck!!
~Jenn~
Hi There,
I am once again playing catchup in blogland, I have enjoyed having a good nosey round your blog at all that I have missed!
this is gorgeous!!! Love the stunning rich colours!!
Hugs Juls
WOW ! Awesome project . great tutorial and clear instructions , well done
Ticked love it cause I do .Thanks for sharing on Make it Monday
Shirley-Anne
Stunning creation!
Thank you so much for joining TTT this week in our Anything Christmas Goes challenge.
Maggie
x
Hi Vix
What a fab idea for a gift, I must try these out. Thanks for the tutorial.
Hugs Kimx
Lovely tea light card/box, Thanks for coming to play with us at Top Tip Tuesday for our Christmas challenge I hope you can come play again soon you can enter up to 3 times per challenge, hugs Samantha :0)
Ps I have candy on my blog too!
Ps forgot to say I saw this at MIM too! xx
Gorgeous! Thank you Vix xx
Oh wow this is such a brilliant tutorial, very inspiring. I'm going to have to have a go at creating some of these, it's such a fabulous gift idea.
The angel looks absolutely stunning too.
Feebsy
zz
This is fab Vix, and the image on the front coloured beautifully, as usual. I do like a money saving idea, especially one that can be turned into a gift and at this time of the year that's perfect.
The tutorial is great, thanks.
Lin xx
Love this tutorial, it is turning out to be very popular I think it is because it is easy to follow too!
I love the image you have chosen too!
Teresa x
wow!!! so creative and gorgeous!!!! HUgs Juls
Just found you and you're right this is so easy thanks to your clear instructions. I'm now off to make another. Thank you for sharing
Wynn x
Post a Comment