Showing posts with label fantasy film. Show all posts

Thursday, 29 April 2010

I love sweet pea stamps but...

A phrase I see often around blogger is "I love sweet pea stamps but..." and its usually about the colouring, I see some people terrified of them! Personally I find them less fiddly and faffy than some other designs as there is generally a large skin area, long flowing hair, tails or wings so not as fiddly or scary as you think. They also have excellent lines such as on the hair making it easy to identify highlight points. Some other designs have solid hair with just the outline, I actually find them much harder to do than sweet peas.

I usually make a wednesday/thursday post for Crafts & Me showing a sweet pea design so what I'll do for a couple of weeks is show you different ways of adding colour using different mediums. Not everyone has promarkers/copics or wants them so I'll cover some other colouring mediums and easy tricks.

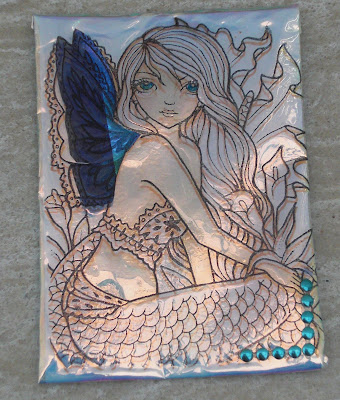
This week is a very simple technique using Fantasy Film. Unfortunately its not the easiest thing to photograph but its highly iridescent and shiny, changes colour in the light and looks spectacular under halogen lights. It also gives a kind of 3d effect when you move it due to the small gap you get between the stamped image and the film.

For this one I have used September Rhythm and mother of pearl fantasy film.

Firstly colour just the skin tones on the stamped image and cut it down to ATC size. Ink up the stamp again using a permanent inkpad such as stazon or brilliance and place one or two pieces of fantasy film over the stamp. Next place a piece of greaseproof paper over the film and using a dry iron such as an encaustic one iron on top of the greaseproof paper until you see the image shwoing through, 20 seconds is about right. If you've never used fantasy film before I have a couple of video tutorials here you might want to check out before starting!

Your image will be on the film now like below.

Next line your film up over your stamped image and secure it at the back. It ight be a tiny bit loose but dont worry it adds to the effect :)

Add some bling and you have an ATC or card topper which is full of gleaming colour!
As there may be a tiny bit of a gap between the film and card it actually gives a 3d effect when you turn it and looks fab!


This one I used Dark Royalty and made the 3d wings using cosmic shimmer film in a contrasting colour. I coloured just the eyes with a promarker.
And finally this one is Dance of the Butterfly and I've coloured more on the film with promarkers. They do spread out rapidly so just a very gentle touch. As I used stazon ink (which reacts with promarkers) you couldnt blend colours like you do with card and paper so just choose areas to touch up with a solid colour.
You can also see the skin tones underneath on the card showing through quite well on this pic.

All of them have a pinky/blue/ pearl colour with the skin tones showing through below. Try different colours of fantasy film for different effects. Hope this has been of some use to you and I'll be back covering some different mediums soon.
All the stamps and fantasy film are available at Crafts and Me in the UK.

Tuesday, 20 April 2010

Enchanted Tag

Over on facebook we have a little mixed media group going to swap tags of a given theme and our 2nd swap is "Enchanted"

For this I've made my tag using a fairy silhouette stamp by Inkadinkadoo which I just totally fell in luuurve with ages ago but never got round to using her! I've made the background with encaustic wax then used my stylus to create a moon. The fairy wings and butterfly are both fantasy film and I've added broken china distress stickles here and there :)
The background card I made by spraying radiant rain solar gold and Moonglow glitz spritz in desert moon endless sky.

If you're interested in swapping tags with some very talented ladies over there pop into the group which you'll find here. There's just enough time to sign up for the next swap which is "Memories"

I'm entering this into

Sir Stampalot - Fantasy (3rd entry, all different type)

This challenge has a CRICUT and CART as its prize and such a fabulous theme so get entering quick quick!!

Tag It On - Under the Moon's shadow
Frankie's baaaaaaack! Welcome back to blogger hunny!


Sunday, 18 April 2010

VIDEO TUTORIAL - HOW TO USE FANTASY FILM

Now this is new territory for me, a VIDEO tutorial so be gentle (and honest!) with me lol!
Having recently got some fantasy film I realised that I actually had this stuff a long time ago but didn't know what it was for or how to use it as it didn't come with instructions back then so if you have some and aree a bit unsure as to how to use it then here's a couple of quick video tutorials on making fairy wings and making 3d butterflies.


MAKING FAIRY WINGS WITH FANTASY FILM


MAKING 3D BUTTERFLIES WITH FANTASY FILM


Just a couple of further notes, if you use a domestic iron set the heat on low and work your way up. I set my encaustic iron to between the low and high settings and this works fine but a domestic iron will probably be hotter so experiment and start low.
Use ink that will dry on non porous surfaces such as stazon, I've used brilliance as I couldnt find my stazon (now found!)
You can use several strips of fantasy film, I do 2 strips as I like things delicate but you can make some fab embellishments using 4 or more sheets.
You can colour fantasy film with copics and promarkers, particularly if you have an airbrush system. You can also add stickles, bling almost anything :)

Wednesday, 14 April 2010

Time for another challenge

Its time for the 2nd challenge over at Crafts and Me! There was a great response to the first challenge and I hope you pop back and check out the new challenge set by Trish which is a colour combo of Brown, Pink and Yellow! They work wonderfully well together :)

Seeing as I'm in a challenging myself mode lately I decided I wanted to make something different so after making one box out of several pieces of chipboard I looked at it and drew one out I could make with a piece of 12x12 card with just a join at the front. This is 4" high by 3" wide and deep and I'm using mine to hold my ATC blanks and bits and pieces that I'm making for the Port Sunny show. I will post destructions separately in another post later on in the week.

I've decorated my box using Stampin' Up tea and crumpets papers and flowers are from stash. The image is Moonlight Whispering by Sweet Pea which you can buy in the UK via Crafts & Me. I've cut the cat out again (sorry cat!) as I wanted her perched on the top of the box. To do this I've left a 1" piece of card below the image which I glued onto the back of the box then covered with the DP's.

I know she's not a fairy but I thought she looked a bit sad that she couldnt fly so I gave her some wings nicked from Dark Royalty :D
To give her wings I've used fantasy film in Dandelion. Think gold with a rainbow sheen. I'll also show you with the box how to use fantasy film, its really easy pwomise :D


I made two sets of wings so they're 3d, they also make rather pretty butterflies if you draw the body bit with perfect pearls, 3d crystal lacquer or similar or perhaps a line of sticky gems :)

Also entering this into...


Sir Stampalot - Fantasy (2nd Entry)

The Crazy Challenge - Don't call me flat
Pollycraft - Pink & Brown plus Yellow (or green)
Flutterby Wednesday - Open week (BTW they have an open DT call if anyone's interested)
Incy Wincy Designs - Something Magical (Also have an open DT call)


3d wings